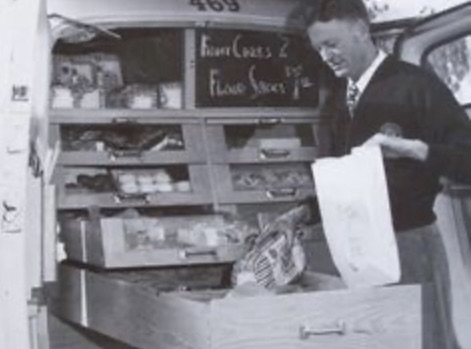
I was thinking about those long drawers. They seamed to be 8 feet long. When your 5 years old or even 8 those drawers seem to go on forever. Filled with chocolaty goodness and cinnamon bread. All types of goodies filled this rolling store on four wheels.
Helms Bakery Truck
Biscuits, breads and sweet treats.
Helms Bakery Truck
Saturday morning we would wait outside on the curb as the Helms Bakery Truck made it way down the street. It seemed it took forever to reach us.
Helms Bakery Truck Drawers
The smell of freshly baked donuts
Helms Bakery Truck
Baggies of cookies and loaves of bread. All fresh and ready for everyone to consume.
Micro shards of plastic are being found in the human brain. So this starts a question of how these microplastics are getting into the … Continue reading Plastic Brain???→
This recipe leaves your rolls nice and moist. Adding a little brown sugar to the recipe can really change the structure of your dough.
Yeast Breads are Quick and Easy to make
For Bread Machine
Level: Simple / Easy
Prep Time: 2.5 hours
Video Below
Not only did I change the sugar. I also used evaporated milk instead of water. These rolls are slamming good. Your name will be having a thank you behind it.
For this recipe I will be using evaporated milk. It produces a moist, tender golden brown crust. You can use evaporated, whole, low-fat or skim milk based on your preference. You can also use nonfat dry milk instead of fresh milk and add water for the required liquid.
Reminder: Adjusting your liquid depending on the type of flour you use. If you will be using bread flour you will have to add 1/4 cup more liquid.
Dough Ingredients
1 can Evaporated Milk
1/4 cup Water
3 tablespoons Butter
4 cups Bread Flour
2 tablespoons Brown Sugar
1 1/2 teaspoon Salt
2 teaspoons Yeast
Dough Directions
Set your machine on “DOUGH” and go do something else.
Once your timer goes off on your bread machine to signal your “DOUGH” is finished, remove pan of dough from machine and place it at work station.
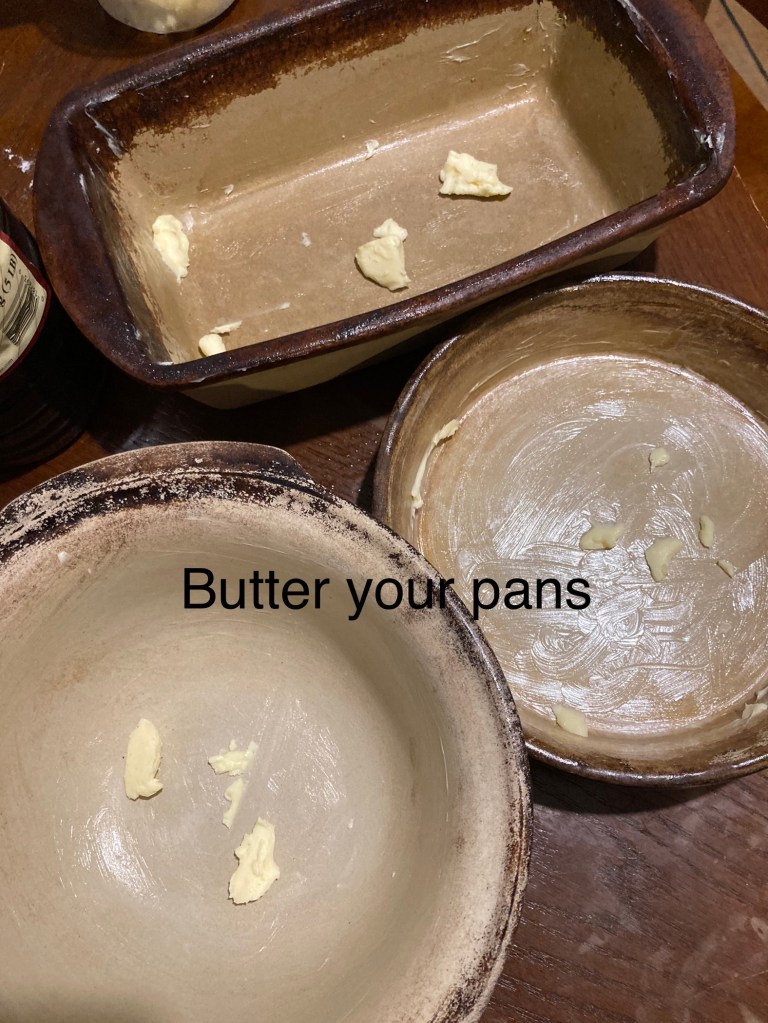
On your work surface place your pans that you will use to cook your rolls.
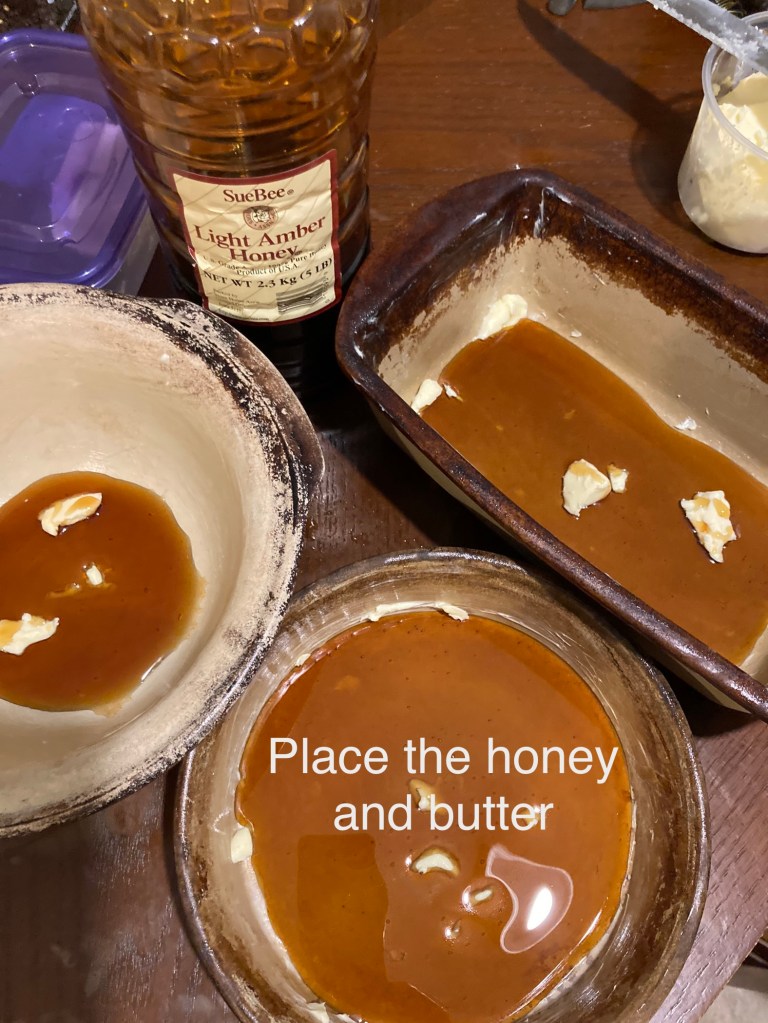
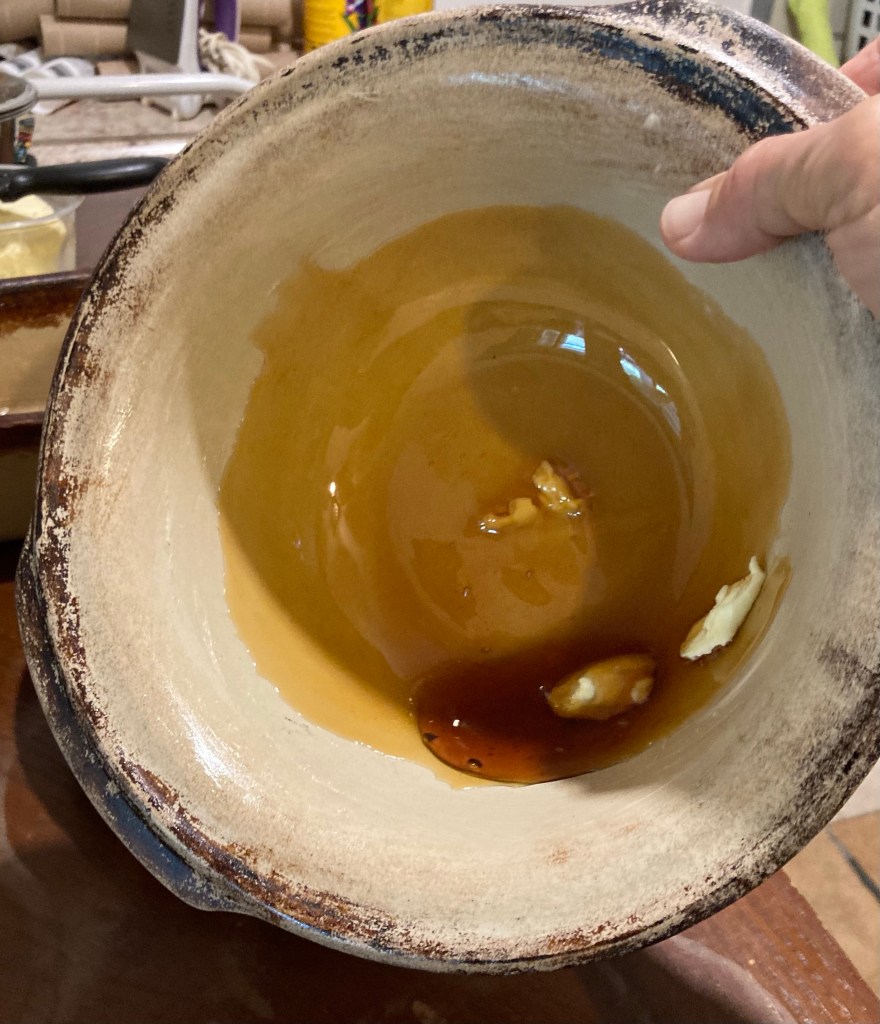
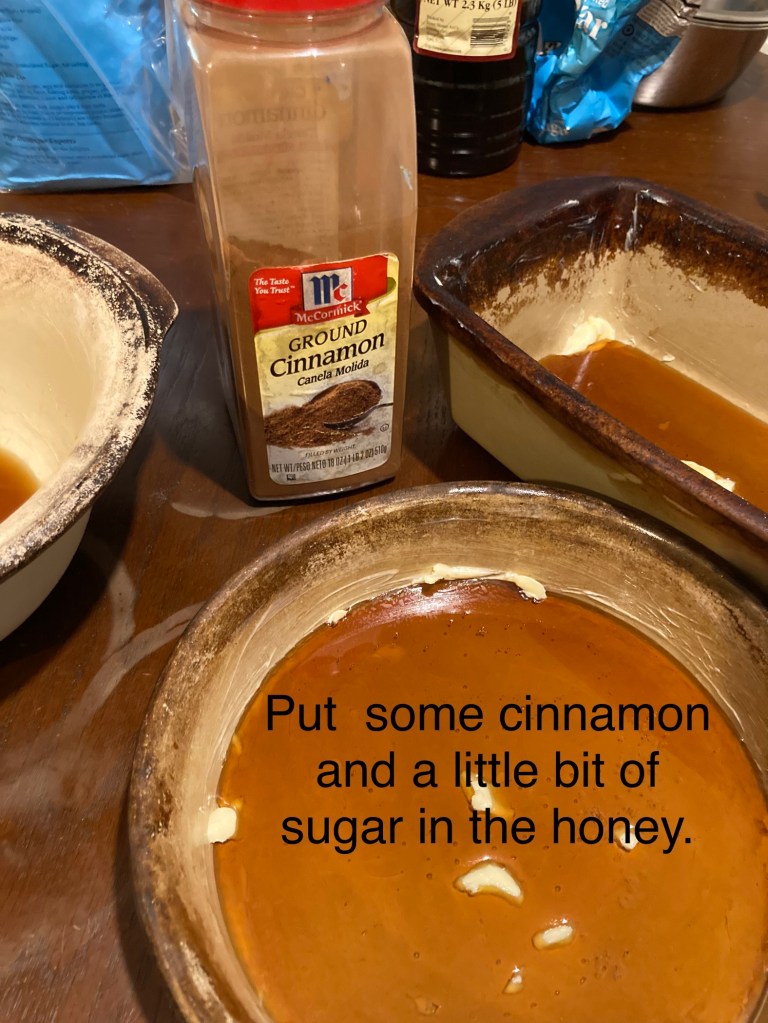
Butter your pans lightly and add the honey.
Coat the sides with the honey
Remove a ball of dough place on table and roll the dough out very thin. If it’s to thick it will come out bread like. So thin is best.
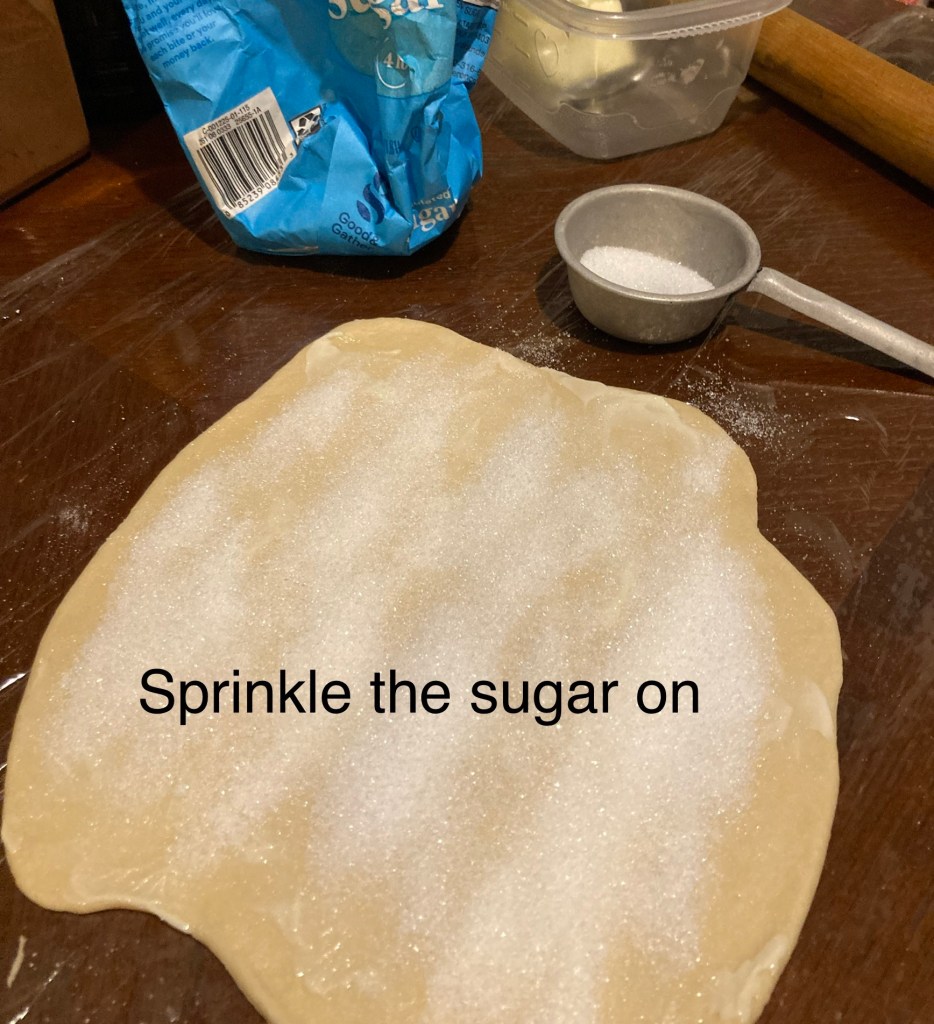
Cover the dough in butterSprinkle some sugarSprinkle the cinnamon onAdd the nuts if you want them. Chopped finely Roll the doughCut the dough halfway through for fancy look.
Cut 2” pieces for the rolls. Place your rolls 1\4″ apart in pan.
Set in warm area to rise for 25 to 45 minutes. Check after 25 minutes. Best if at least twice to 3 times original size or more.
Place the rolls in the pansRolls are rising
Remove from proofing. Preheat your oven to 350 degrees if convection and 375 regular.
Place your pan in the oven on the center rack. Cook for 25 to 30 minutes or until light brown tops.
Do Not Over Cook… Check through glass door of oven after 25 minutes see if tops are brown then remove them. If not, check at 30 minutes.
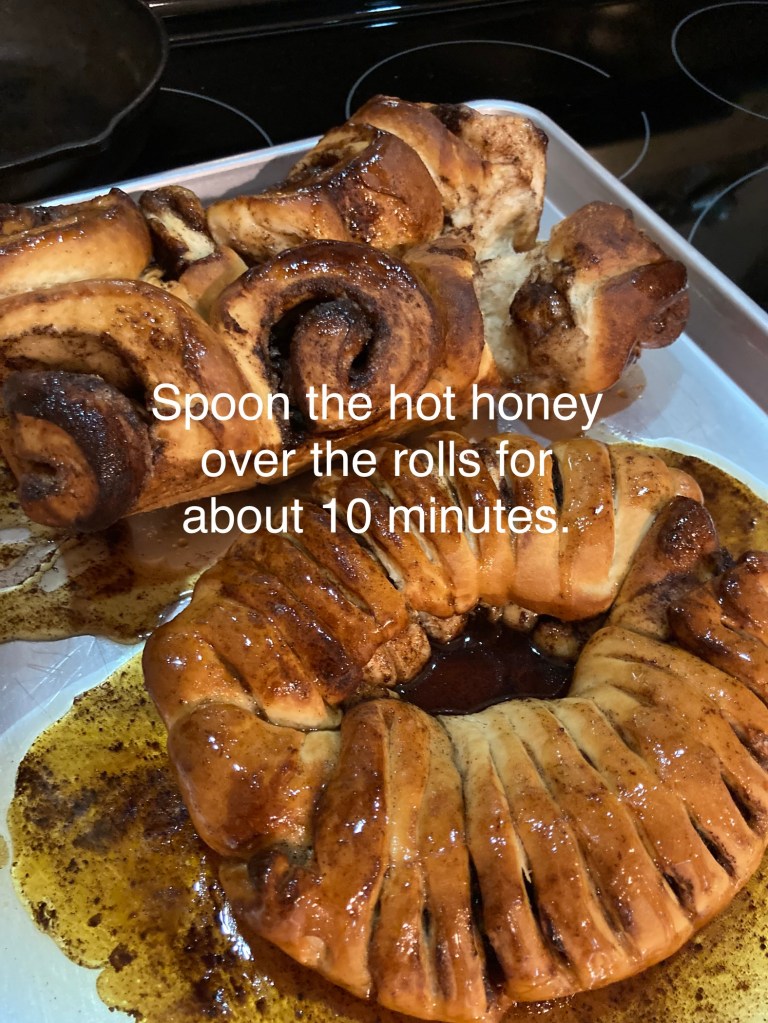
Remove from oven
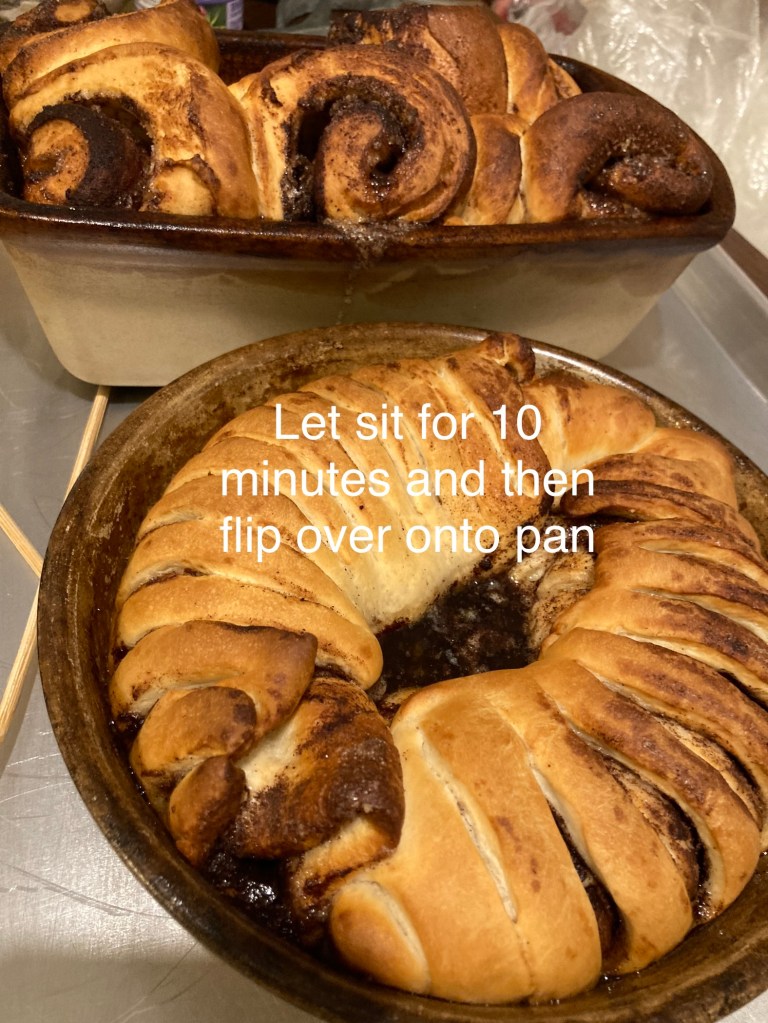
Remove and let cool at least 10 minutes.
After 10 minutes slowly flip the pan onto another pan. Cinnamon rolls flipped onto trayFlip the rolls overSpoon the hot honey on for 10 minutes
As you gain more confidence at baking bread you will be able to lightly knock on bread and rolls. Easy way to know they are done…
When the timer goes off knock lightly with your finger tip nail on top of rolls “FLICK” it in the center. They will be crispy on the crust. You will hear a clear tone when they are done.
Cooking is amazing once you get going. So every time you bake bread. Keep baking, you will see…
You can also freeze any extra dough. Just make the size of dough lay them on a cookie sheet and freeze and remove place in a baggie and take them out of freezer as you want. Easy simple.
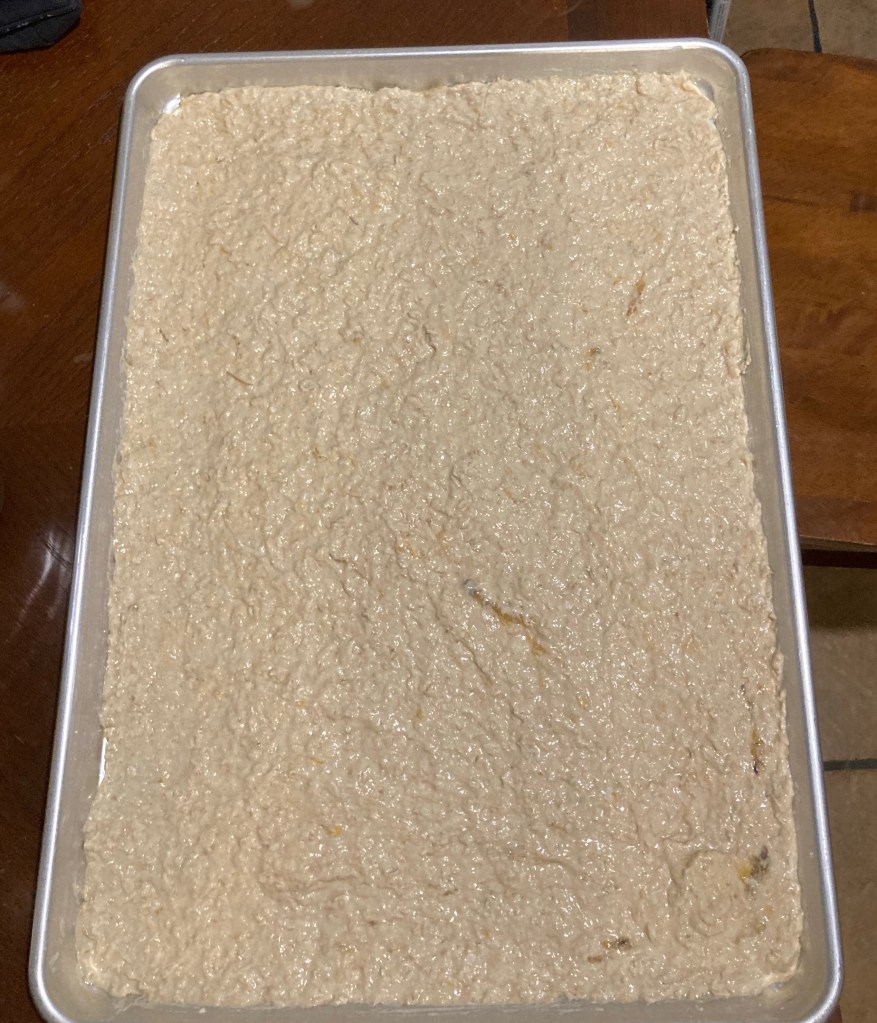
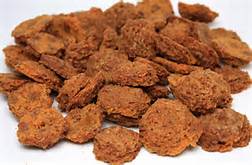
Just trying out some new recipes for the fur babes. They love these cookies. So this week changing the fruit to apples. It’s healthy and nutritious.
Apple Peanut Butter Cookies
Apples, Peanut Butter Oatmeal cookies
INGREDIENTS
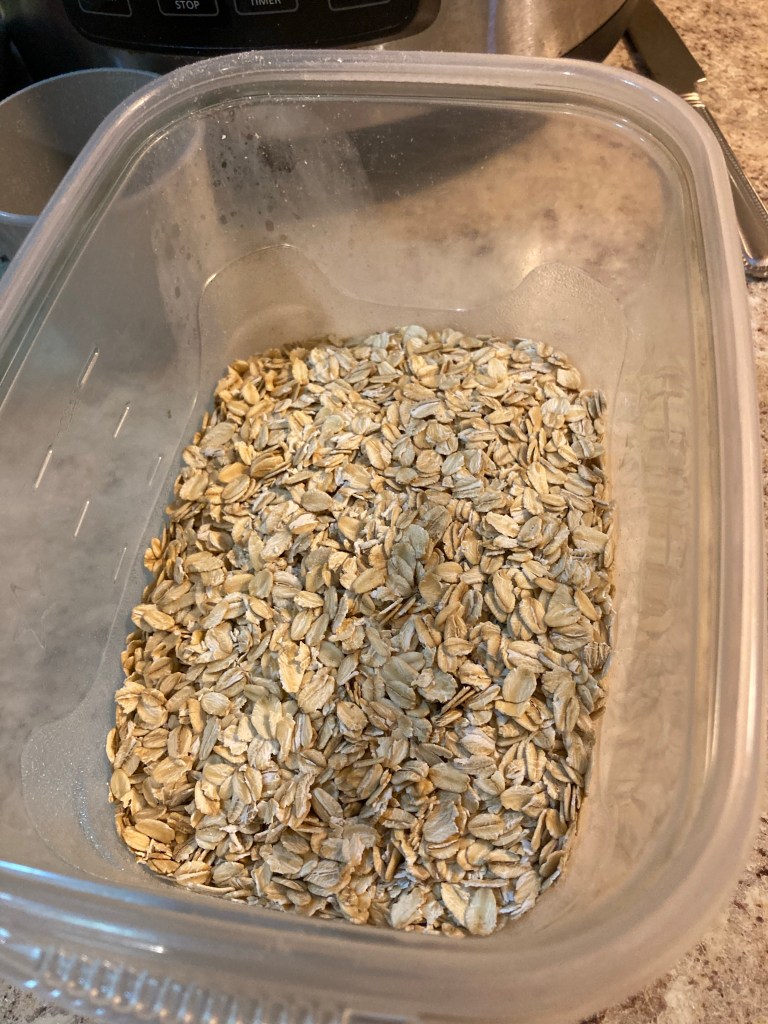
2 cups Oatmeal (soaked)
1/2” inch Water cover above oats
1 medium Green Apple
1 cup Peanut butter
2 cups All Purpose Flour
2 Tablespoon Turmeric Powder
1 teaspoon Black Pepper
1/4 to 1/2 cup Water (add slowly to thin mix batter out if needed)
DIRECTIONS
Place 2 cups oatmeal in container and cover 1/2 inch water over the top. Leave that set until almost all the water has been absorbed. About 1.5 hour
2 cups Oatmeal 1/2” inch water to cover oatmeal 1/2 “ inch or middle of the thumb of water over the oatmeal, leave soaking for 1 to 1.5 hours
Heat oven to 400 degree F. Grease 1” x 15”x 21” cookie sheet with the olive oil
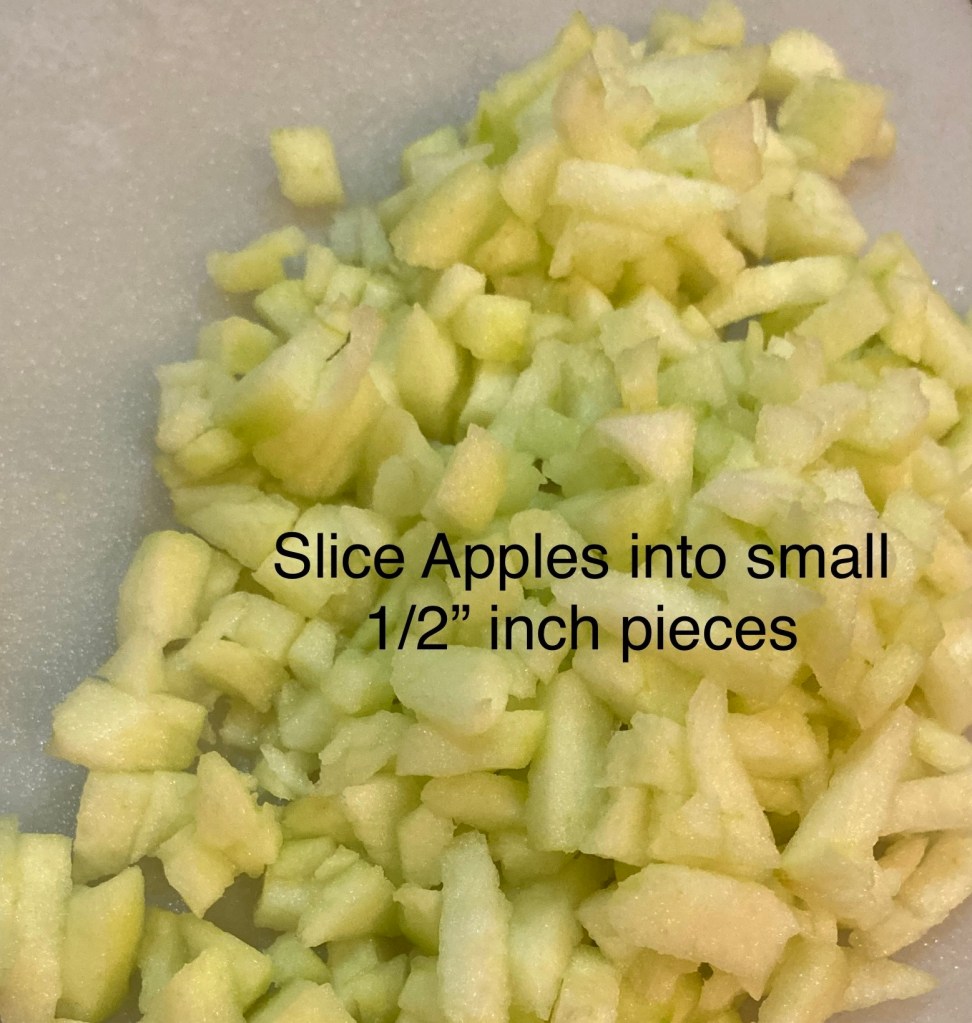
Slice apples into small 1/2” inch pieces
Stir / Cream the ingredients together. Make sure everything is mixed together.
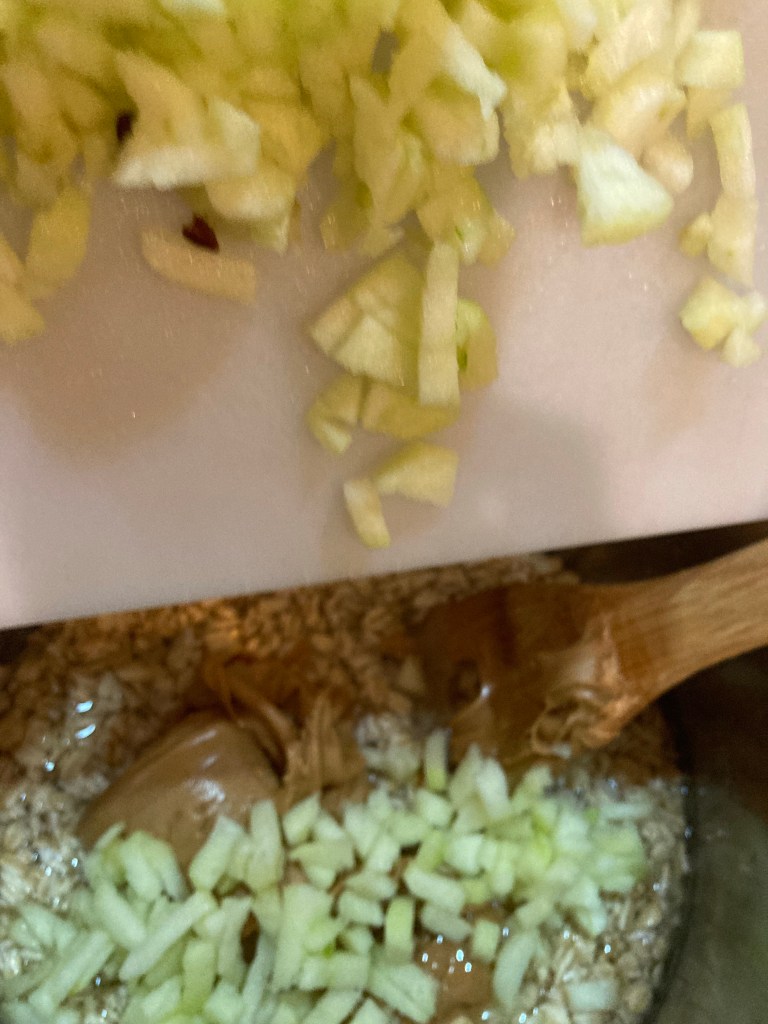
Add 1 cup Peanut Butter to the Oatmeal
Place the sliced apples in the bowl
Add 1 1/2 cups Sliced Apples
After getting those ingredients mixed time to add the flour.
Add 2 cups FlourAdd extra water as needed to thin out batter
Place the dough onto the cookie sheet and smooth out to thin layer.
Smooth out evenly
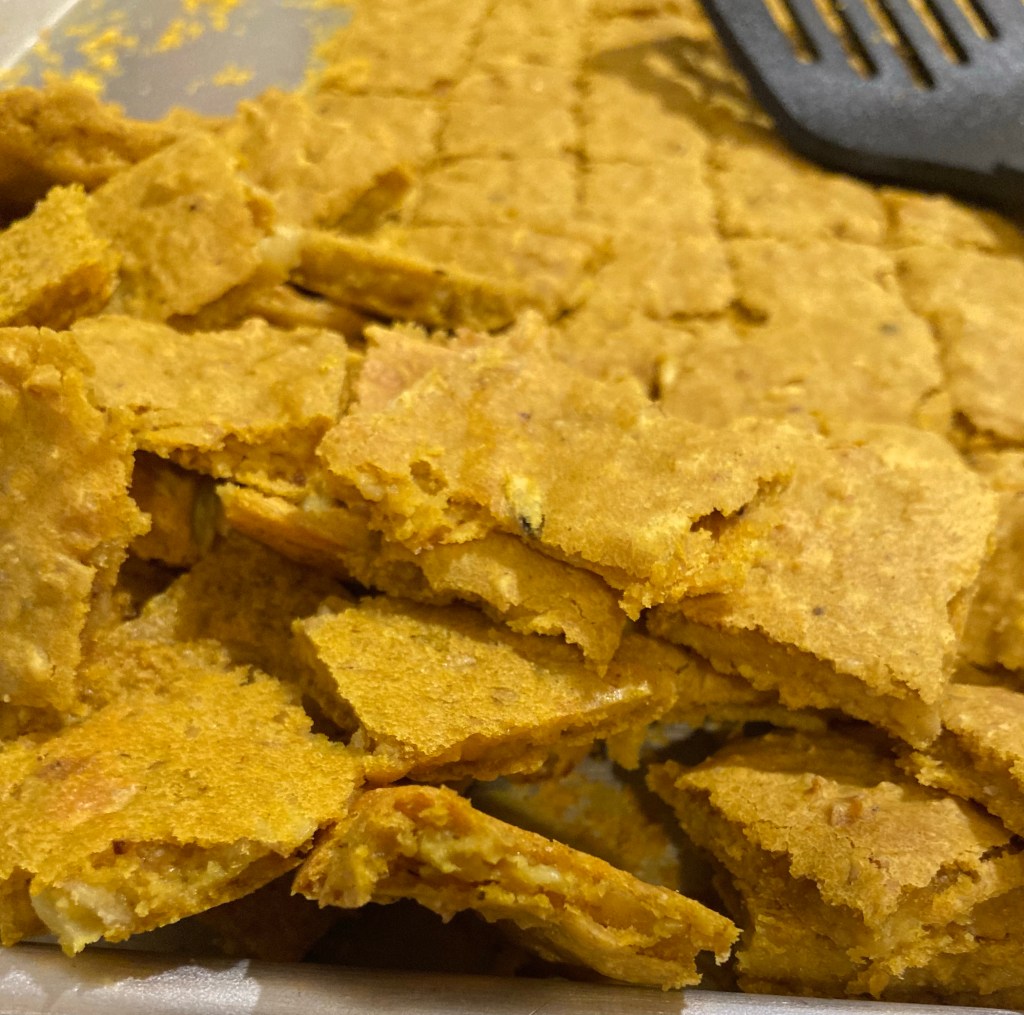
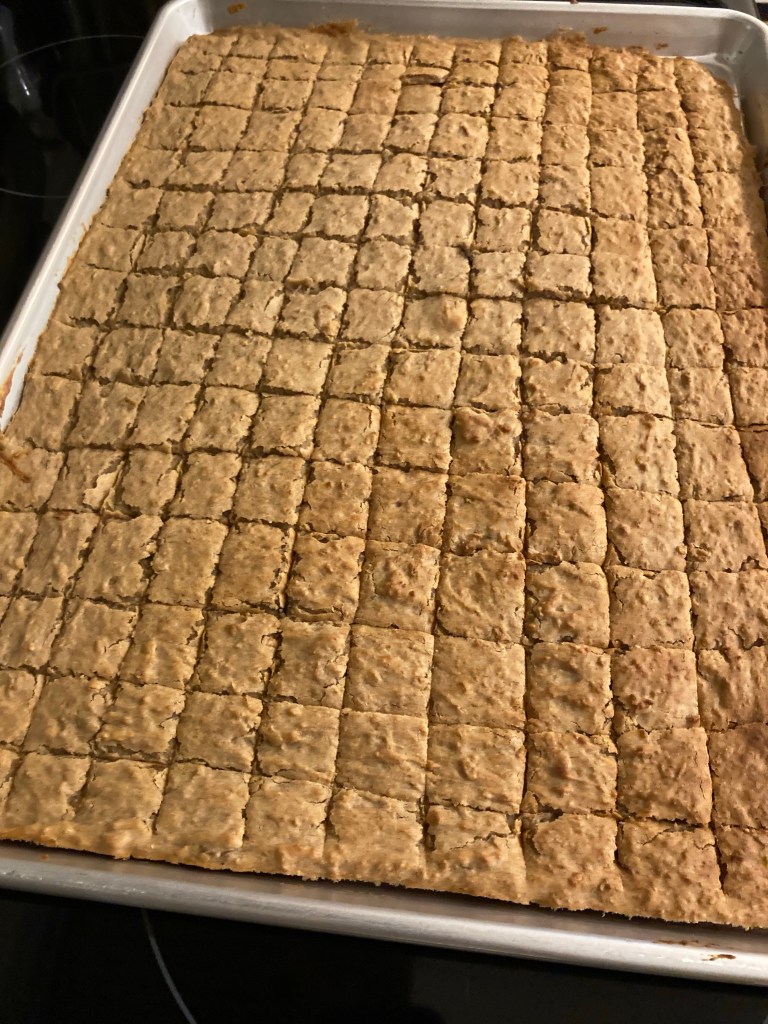
Place in oven on center rack for 30 minutes
After 30 minutes remove the pan from the oven. The sides should be slightly pulled away from the pans edge and golden brown in color.
Get the pizza cutter and cut your squares. Wait until cookies are cool to touch.
Take the pizza cutter wheel and cut into squares
You can make the size of the cookie fit your dog.
Cut into 1” to 2” inch pieces
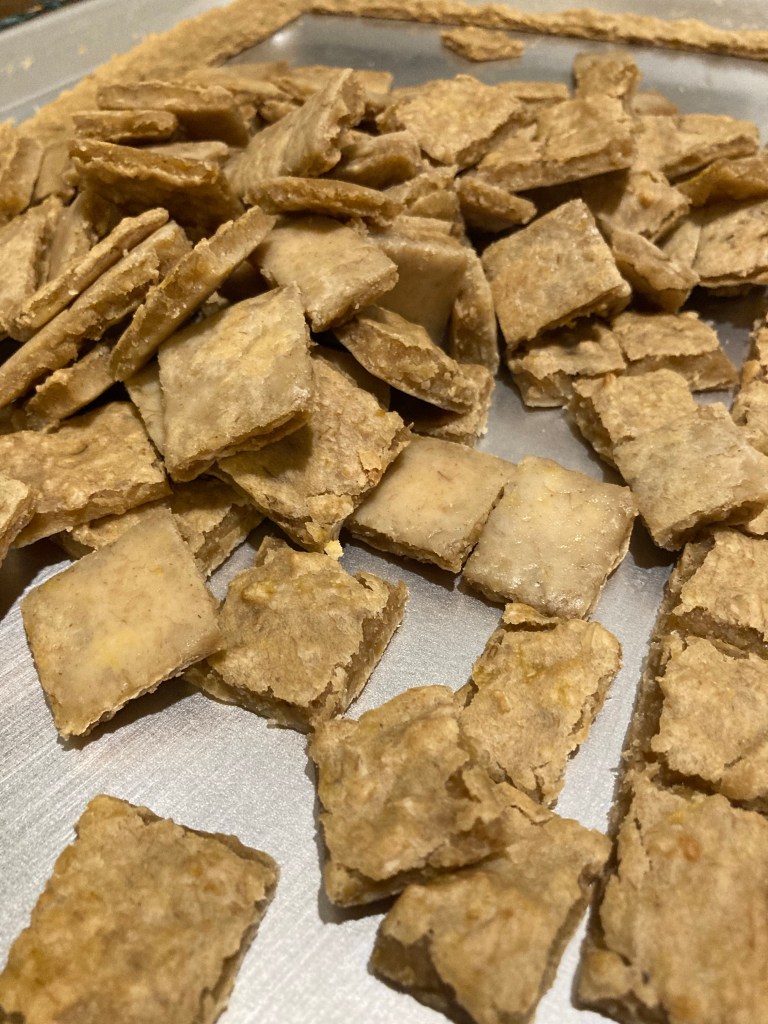
Remove from pan after completely cool.
Cookies can be removed from the pan after completely cooled
Put into an airtight container and place in the refrigerator or freezer. I have 4 dogs and this last 3 weeks. I also just take out what I need.
Place cookies in the air tight container
You can adjust this recipe to your dogs taste or yours. I ate one and I could taste the apples and peanut butter. My dogs on the other hand could really smell their treats baking and waited by the kitchen door in utter excitement. They smell something new.
Now that everyone is blindly making treats for their pets. Sadly we must check human ingredients to make sure there are not any things that will harm them.
We are not checking the ingredients that companies are using.
Please educate yourself so your dog stays alive!!!
Please, it’s just not chocolate that can harm and possible cause death. There is a long list of ingredients you need to be aware of. Some you would never think would. I was shocked myself the first time I read it.
You could be creating other injuries to their organs by using these ingredients.
Xylitol
Avocado seed, skin, leaves
Grapes and raisins
Garlic?
Macadamia nut
Chocolate
Cooked bones
Caffeine
Leeks and onions
Alcohol
Salt
Baking soda
Baking powder
Citrus oil cold pressed
Essential oils
Dairy – like whip cream in a can
Cat Food
Bacon
Tobacco – Cigarettes – Cigars
Gelatin
Butylated Hydroxyanisole (BHA)
Butylated Hydroxytoluene (BHT)
Ethoxyquin (“Fish Meal”)
Propylene Glycol
Food Dyes
Rendered Fat
Pam / Vegetable sprays aerosols
Wheat Gluten
Meat By-products
Nutmeg
Peaches pits
Mustard
Raw dough
Unsweetened organic applesauce
If your going to use store bought applesauce please read the ingredients. The are 3 ingredients in this brand. Apples, water and ascorbic acid. This is perfect. No unknown hard to pronounce words.
Store bought ingredients sometimes have harmful ingredients. Most times not good ingredients for your dog.
If you don’t know if it’s ok for your dog as google or the internet. “Is it ok to give my dog Xylitol”.
We are excited to introduce Dr. Becker’s Forever Dog Bites. This unique one-of-a-kind treat was crafted by years of research that can be found in the newly released book, “The Forever Dog.”
Just what my doggies ordered. They love these cookies. It’s healthy and nutritious.
Banana, Peanut Butter Oatmeal cookies
INGREDIENTS
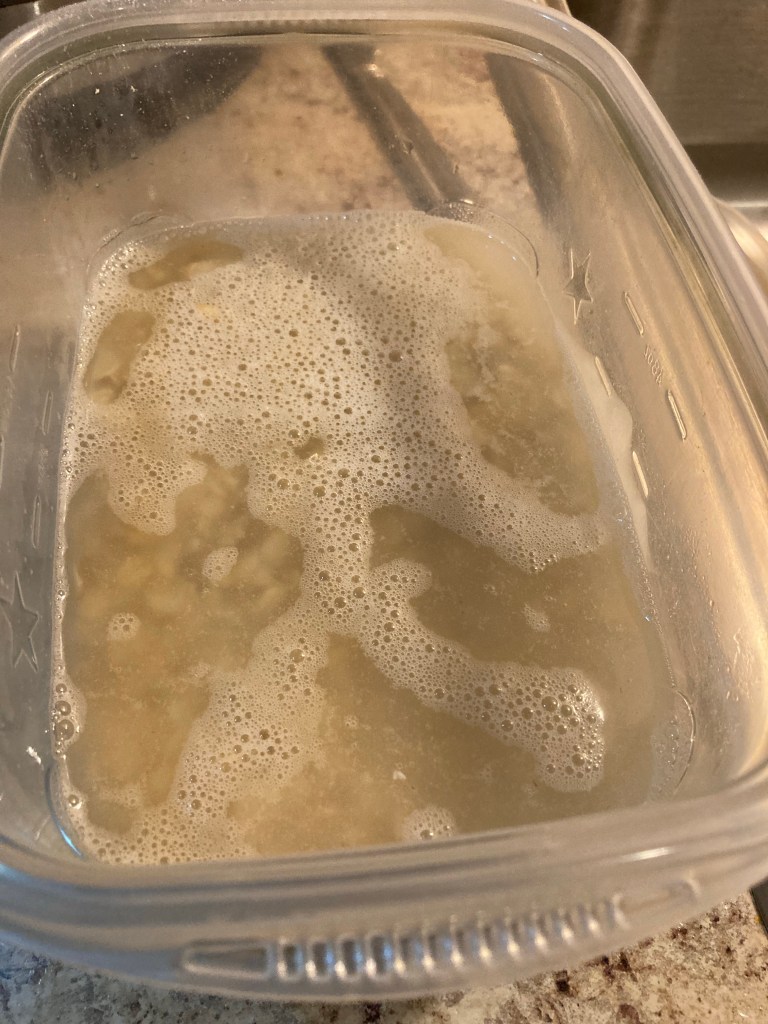
2 cups Oatmeal (soaked)
1/2” inch Water cover above oats
1 cup Banana
1/2 cup Peanut butter
2 cups All Purpose Flour
1 Tablespoon Olive oil
DIRECTIONS
Place 2 cups oatmeal in container and cover 1/2 inch water over the top. Leave that set until almost all the water has been absorbed. About 1.5 hour
2 cups Oatmeal 1/2” inch water to cover oatmeal 1/2 “ inch water over oatmeal soaking 1 to 1.5 hours
Heat oven to 350’ degree F. Grease 1” x 15”x 21” cookie sheet with the olive oil
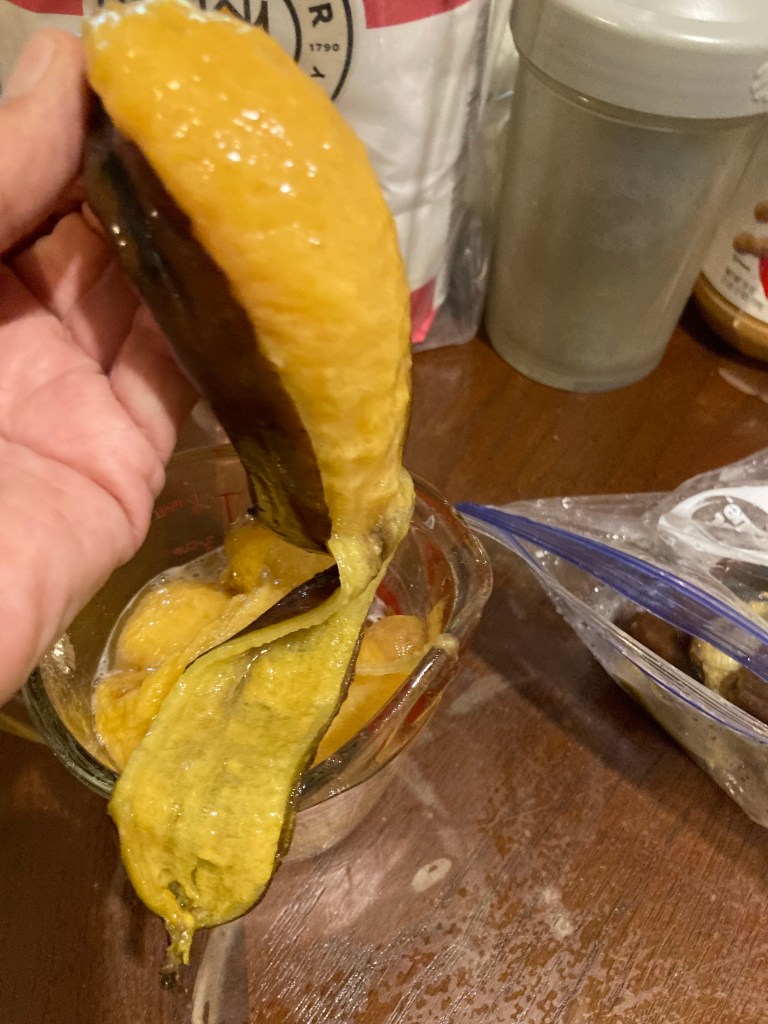
Frozen bananas to peelPeel banana’s Golden banana’s from my trees
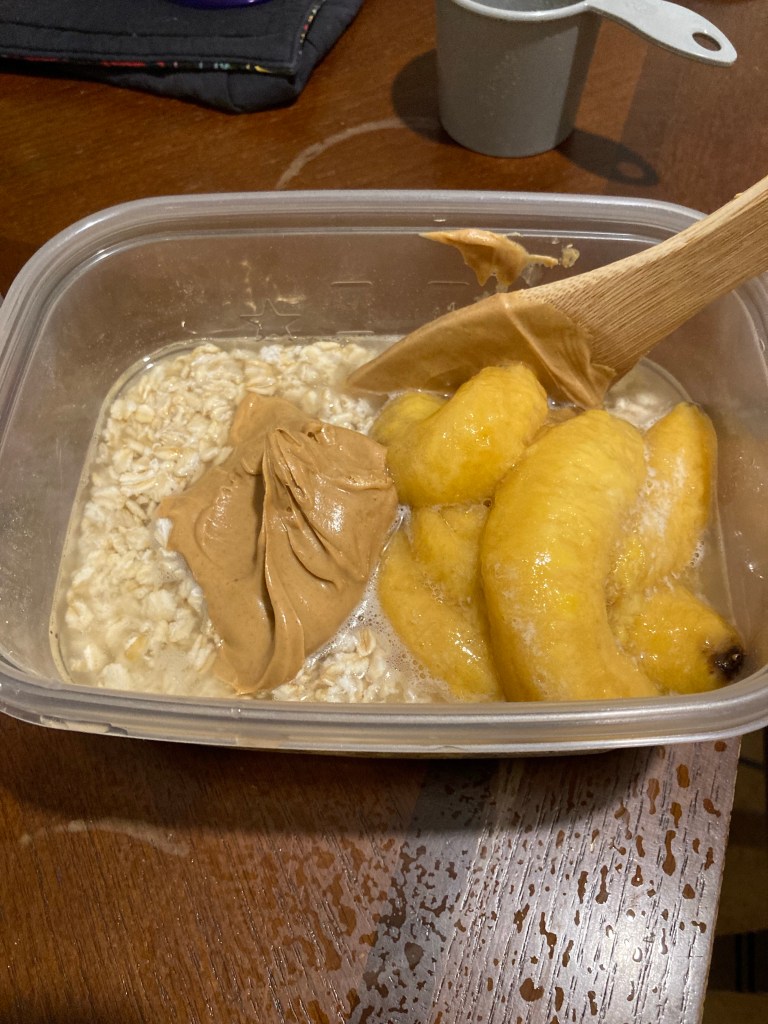
Place the banana, peanut butter and oatmeal.
Stir / Cream the ingredients together. Make sure all the bananas are mixed in good. You might want to mix the bananas prior to adding to the mix.
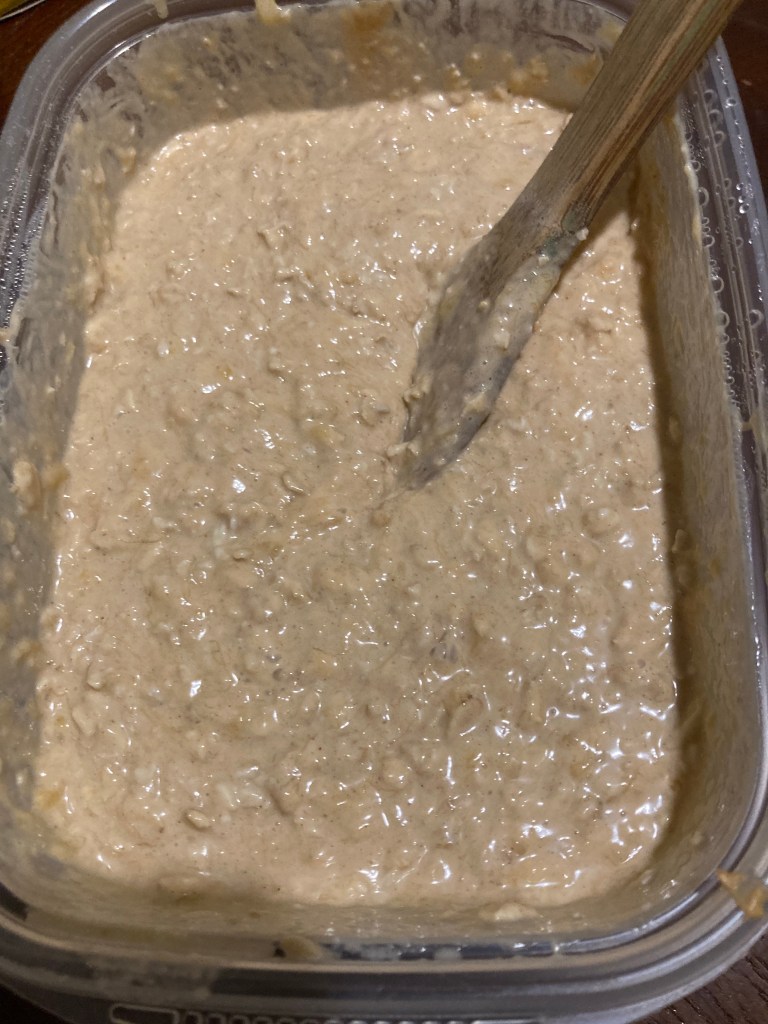
After getting those ingredients mixed time to add the flour.
Place the dough onto the cookie sheet and smooth out to thin layer.
Place in oven on center rack for 30 minutes. take out of oven. The sides should be pulled away from pan. Get the pizza cutter and cut your squares. Turn oven off and put the pan back into the oven and let bake until cool. You can make the size of the cookie fit your dog. I have 4 dogs in various sizes. From 85 to 15 pounds. So my cookies are various sizes.
After 30 minutes remove from the oven
Cut your squares and put them back into the oven until completely cool.
Remove from oven after completely cool. Put into an airtight container and refrigerator. I have 4 dogs and this last 3 weeks. You can also freeze them and just take out what you need.
Your dogs will love them until the last cookie…
You can adjust this recipe to your dogs taste or yours. I ate one and i couldn’t taste the peanut butter. I did a second recipe with 1 1/2 cups of peanut butter. I can taste the peanut butter and my dogs could really smell their treats baking and waited by the kitchen door.
When I say ULTIMATE I mean only 3/4 cup Brown Sugar and NO vegetable oil.
This recipe is the best banana nut bread I have tested lately. In the past year I have made 11 banana nut bread recipes.
This recipe is so full of natural flavor without all the sugar. You can taste the hint of cinnamon and vanilla.
There is no Rancid vegetable oil in this recipe either. I am switching out all vegetable oils for animal fat rich butter, lard and what ever else I can try.
This is a very dense, but fluffy quick bread
This slideshow requires JavaScript.
Prep Time: 20 to 30 minutes
Cook Time: 60 to 65 minutes
Total Time: 95 minutes
Yield: 8 servings +
Skill Level: Beginner / Easy
Kitchen Appliance: Food Processor, Mixer or by hand and Oven
Ingredients
2 cups all-purpose flour or what ever flour you want to use
1 teaspoon baking soda
1/4 teaspoon salt
1/2 teaspoon ground cinnamon
1/2 cup (1 stick) unsalted butter, softened to room temperature
3/4 cup packed light or dark brown sugar
2 large eggs, at room temperature
1/3 cup plain sour cream
2 cups mashed bananas (about 4 large ripe bananas)
1 teaspoon pure vanilla extract
optional: 3/4 cup (100g) chopped pecans or walnuts
Instructions
Adjust the oven rack to the lower third position and preheat the oven to 350°F (177°C).
Grease a 9×5-inch loaf pan. Set aside.
Whisk or stir the flour, baking soda, salt, and cinnamon together in a large bowl.
Using a mixer, whisk or a really good spoon, cream the butter and brown sugar together until smooth and creamy, about 4 minutes.
Add the eggs one at a time, stirring well after each addition.
Stir in the yogurt, mashed bananas, and vanilla extract on medium speed until combined.
Slowly mix the wet ingredients into the dry ingredients until no flour pockets remain.
Do not overmix.
Fold in the nuts, if using.
Spoon the batter into the prepared baking pan and bake for 60-65 minutes.
Loosely cover the bread with aluminum foil after 30 minutes to help prevent the top and sides from getting too brown.
A toothpick inserted in the center of the loaf will come out clean when the bread is done.
Remove from the oven and allow the bread to cool completely in the pan set on a wire rack.
Cover and store banana bread at room temperature for 2 days or in the refrigerator for up to 1 week.
Banana bread tastes best on day 2 after the flavors have settled together.
You can finish this recipe off with butter, cream cheese frosting or Ice Cream.
Preheat oven to 450 degrees F (230 degrees C). Confection Oven lower temp by 20 degrees.
In a large bowl, combine flour, baking powder, sugar and salt.
This slideshow requires JavaScript.
Cut the butter into cubes and start cutting the butter into the flour mixture with a fork. Smash the butter and flour until small pieces start to make a crumble.
Stir in water, just until moistened.
Drop batter on a lightly greased cookie sheet by the tablespoon.
Bake in preheated oven until golden on the edges, about 10 to 15 minutes. Serve warm
You can also substitute different types of flour. Rice, Coconut, or Red Mills gluten free flour mix.
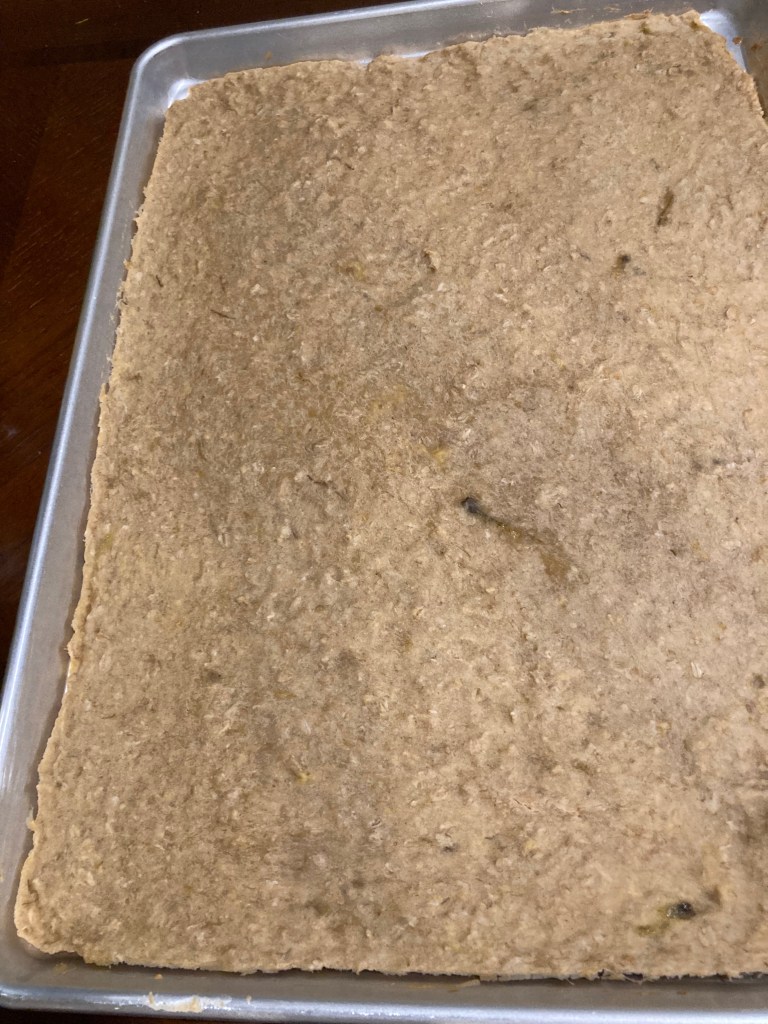
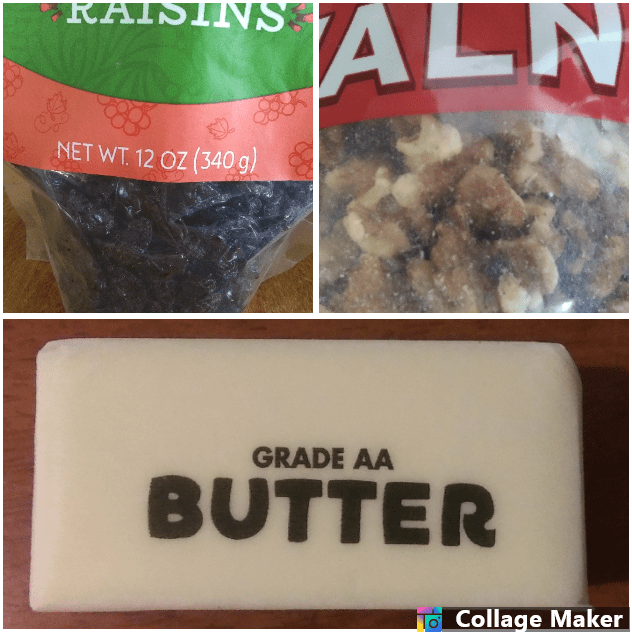
You can also make a paste with the raisins and walnuts. It becomes a very smooth buttery experience for the thinner pastry dough.
Dough Ingredients
1 cup Water
3/8 cup Milk (Whole)
3/4 Stick Butter (chopped into tiny pieces and evenly placed in the pan)
1 and 3/4 teaspoon Salt (on the Left side top corner of the pan)
4 cups Flour (in the center place a shallow divot to place yeast ans a little sugar)
2 tablespoons Sugar (on the bottom right corner and a small sprinkle in the divot maybe 1/4 teaspoon)(Real Sugar, No Substitute)( Trust me, it won’t hurt you)
2 and 1/4 teaspoons Active Dry Yeast ( place in pivot on top of sprinkled sugar)(NO QUICK YEAST) Old Fashion kind…
While your bread machine makes the dough get all your other ingredients together.
Soak the cup of raisins in 1/4 cup of warm water for at least 45 minutes. I just let them soak until my dough is ready. Drain and set aside. If you are using the raisin paste its better to make the paste a day ahead. Remove from refrigerator at least 2 hours prior. Must be at room temperature.
Prep Time: 10 minutes Cook Time: 10 minutes Total Time: 20 – 30 minutes Yield: 1 servings + Skill Level: Easy Kitchen Appliance: Food Processor, Stove, sauce pan and spatula
Raisin paste is always a good match for thinner dough, thumbprint cookies or cinnamon rolls if the dough is thinly rolled and its more of a delicate pastry. The raisin paste is great for Filo, buttery, croissant Doughs.
Ingredients
1 Cup Raisins
1/4 to 2/3 cup Water (enough to cover raisins)
1/2 stick Butter
2 tablespoons Sugar
2 tablespoons Cinnamon
Directions
Add the Raisins and water into the saucepan and place on stove
Bring to a boil and turn down fire.
Simmer for 10 minutes
Remove from heat and add the butter, cinnamon and sugar.
Stir until the sugar dissolves
Use you spatula to remove everything and place into the food processor.
Make sure it processes to a smooth texture.
Take your spatula and remove all the paste into a container with a lid.
Set in refrigerator until ready to use.
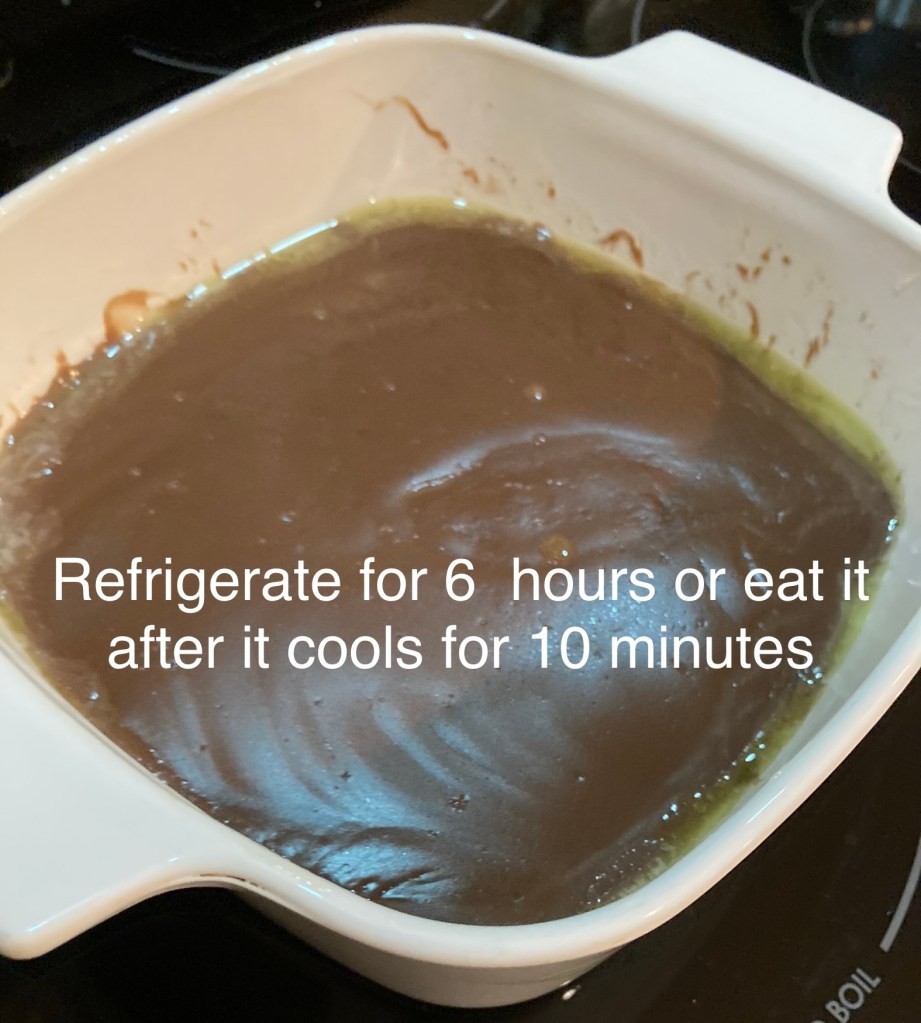
Its better to make the paste a day ahead or even a few days. Remove from refrigerator at least 2 hours prior to use. Must be at room temperature so it spreads evenly like butter. This is awesome on toast in the morning.
It seems appropriate that today, my Dear Dad’s birthday, I have spent much of the day making marmalade. Dad was the marmalade maker in our house and I used to help him when I was quite young. The smell of the oranges boiling is so evocative of lovely times. I spent the rest of the […]
I am using some left over Apple Cinnamon filling from the empanadas that I made for Christmas breakfast. I had made a large batch of Apple Cinnamon Filling and put 2 big tubs in the freezer for later. Enough for 2 deep dish pies.
Butter Pastry Crust for Sweet and Savory Pies (2 crusts)
Ingredients
2 1/2 cups all-purpose flour, plus extra for rolling
1 cup (2 sticks or 8 ounces) unsalted butter, very-cold, cut into 1/2 inch cubes
Prep Time: 5 minutes Yield: 2 o 6 pie crust tops Skill Level: Easy Beginner Kitchen Appliance: Manual Fork
Add egg wash or you get dull pastries like this
Image on left with egg wash, on the right no egg wash.
Egg products, such as egg whites or egg yolks, supply coating, gloss or finishing to foods within the baking category. Consumers expect a certain appearance on the outside of baked goods, such as color or finish. Food color overall is an indicator of quality, including the color of finished baked products. The proper coating or finish not only aids with appearance but can also help extend shelf life by sealing in moisture.
Slightly beaten liquid egg products can serve as a coating or glaze on baked goods, with different variations of the egg mixture according to the desired appearance and texture of the final product. A baker might select either egg yolk, egg white or whole eggs for varying results.
The white is the primary source of proteins in an egg. When whites alone are used as a coating the proteins coagulate and draw moisture from the product, with eventually evaporates, resulting in a crisp surface. An egg wash can also give the baked product a finished, slightly glossy look. Protein browns when exposed to heat, so the addition of an egg wash helps give baked goods a bronzed sheen, in addition to the gloss.
Slightly beaten yolk or eggs, brushed onto surface of unbaked good helps prevent crust from drying out and lends a glossy look. Added at a certain stage in the baking process, the egg wash can help prevent overbrowning. However in order to seal in moisture, yolks must be used in the egg wash.
An egg wash application is common not just for bread, but also different types of pastries or pies, to promote browning, create a glossy shine or both. A variety of other ingredients added in different proportions to the selected egg product (whole egg, egg white or egg yolk), will supply different levels of browning, shine and even texture to the crust surface
INGREDIENTS
1 Tbsp heavy cream, half and half, milk or water
1 large egg yolk or egg white
Beat egg yolk with cream and brush on the surface of the pie with a pastry brush.
Time: 20 Minutes Skill Level: Easy Suggested age: 6 months and up
Ingredients:
1 cup prunes
2/3 Cups Water
Combine prunes and 2/3 cup water in a small saucepan and bring to a boil. Lower heat to medium-low, cover and simmer until very soft, about 10 minutes.
Carefully transfer prune mixture to a food processor and purée until smooth.
The purée will keep refrigerated in an airtight container for up to 3 days or in the freezer for up to 3 months.
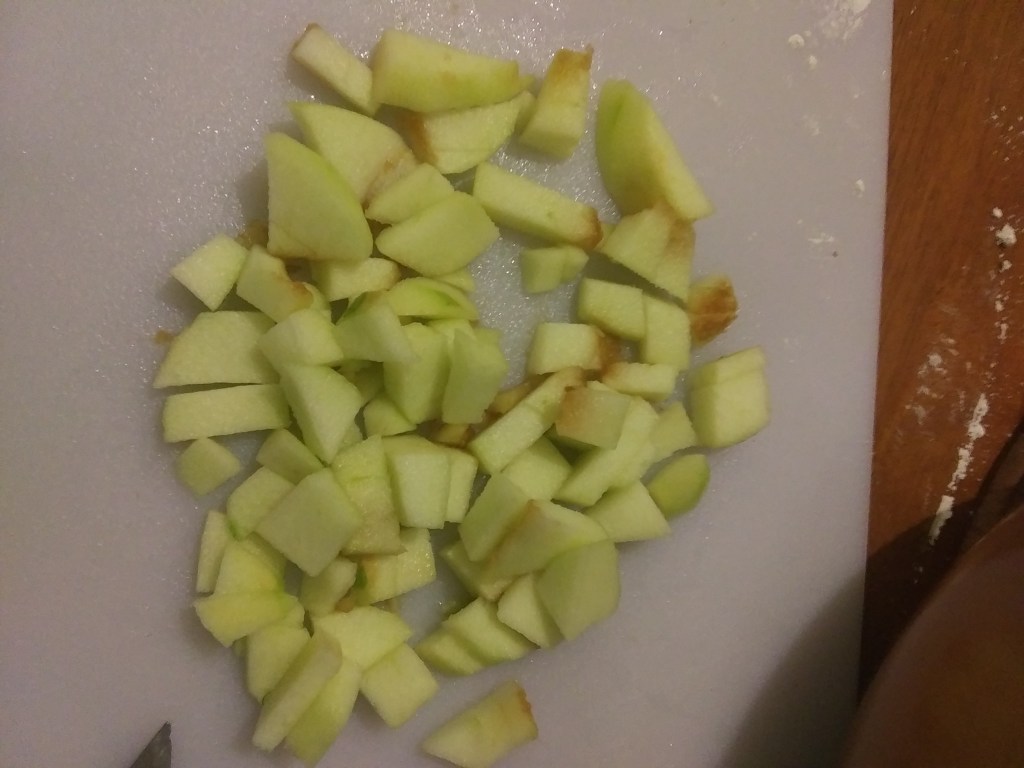
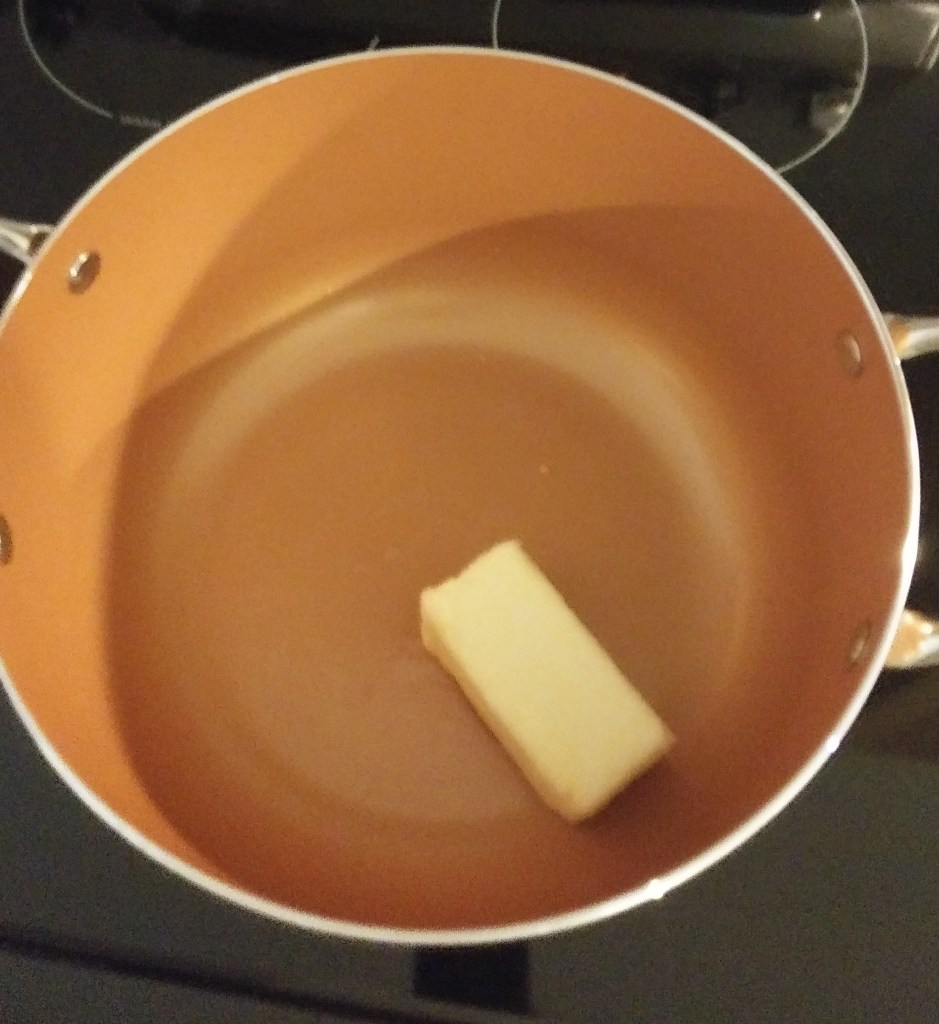
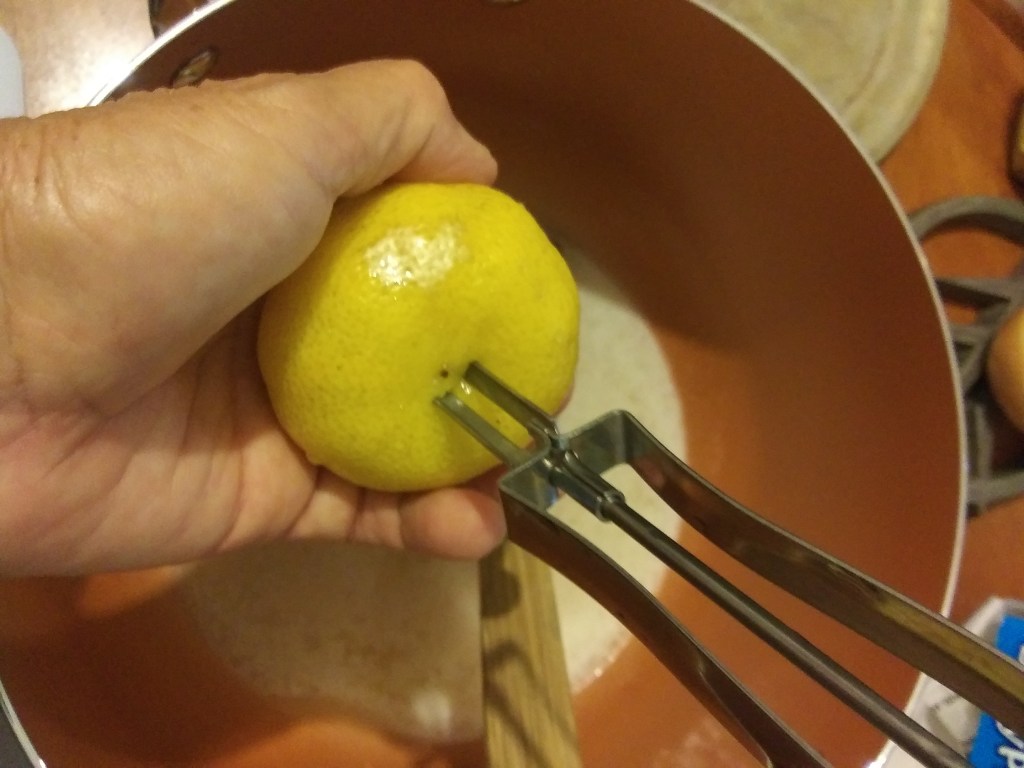
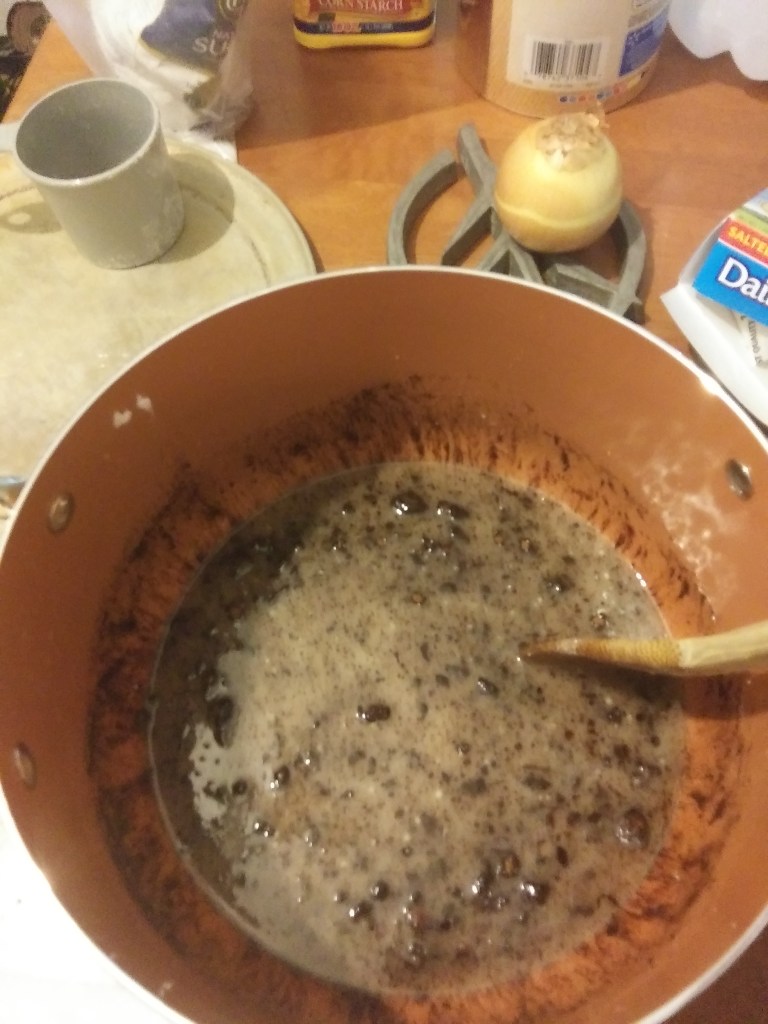
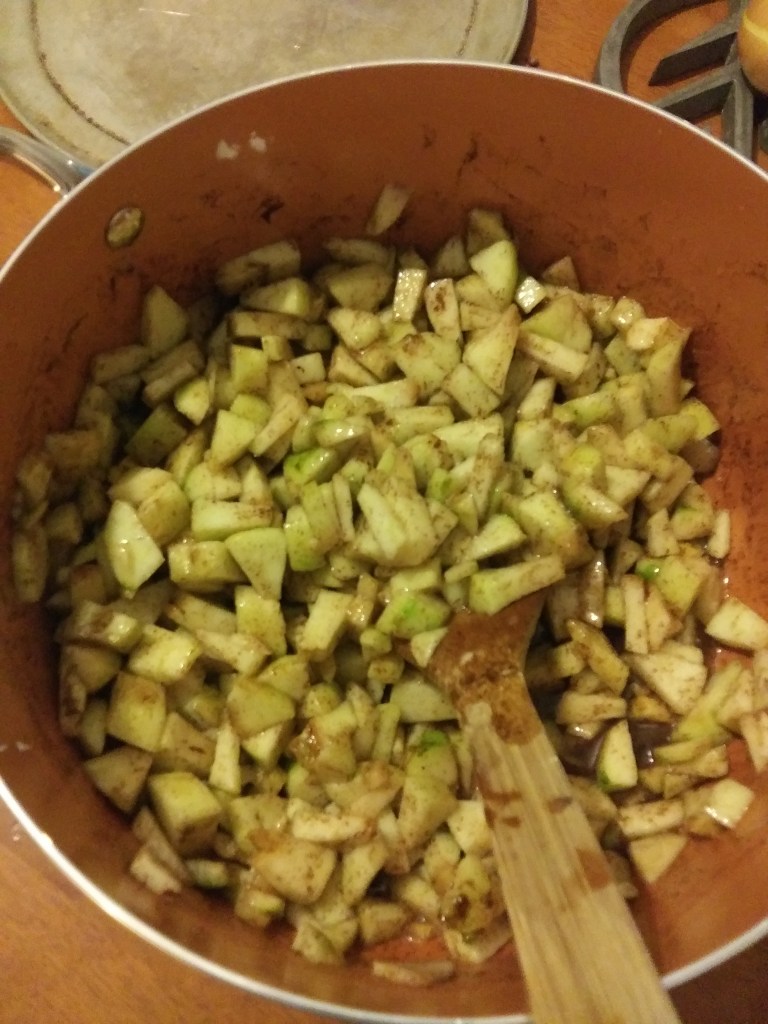
Yummy Sweet apples and cinnamon. Great for making pies, party appetizers or handy snack size for Apple pie ice cream ala mode.
Apple Filling Instructions
Ingredients
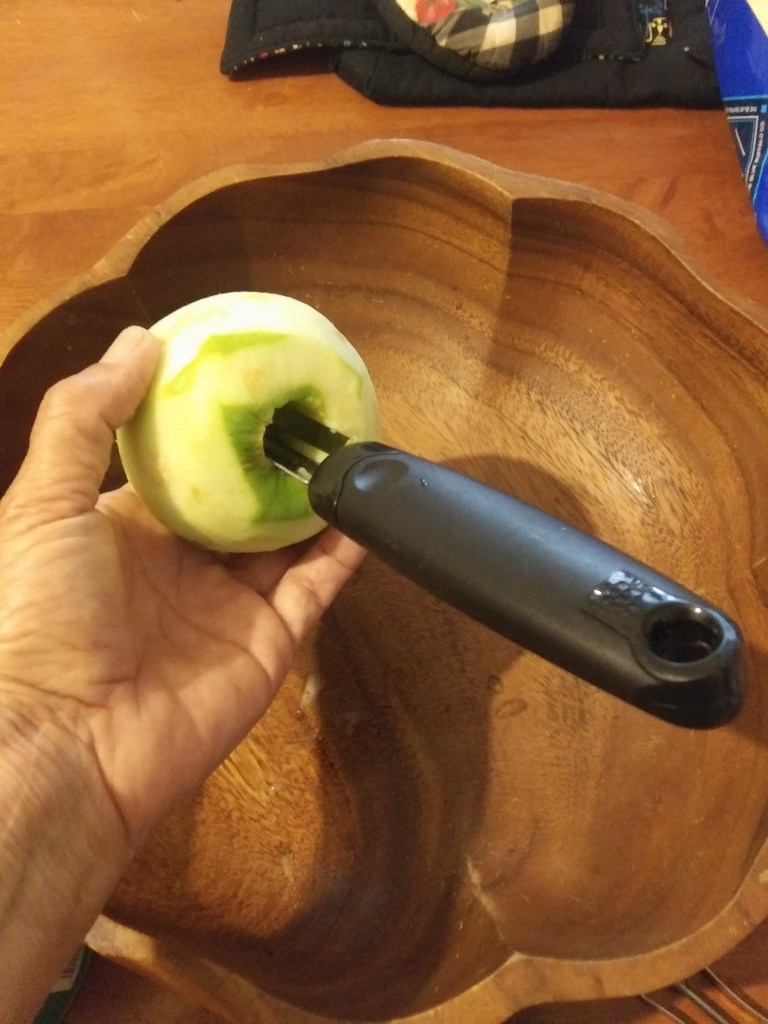
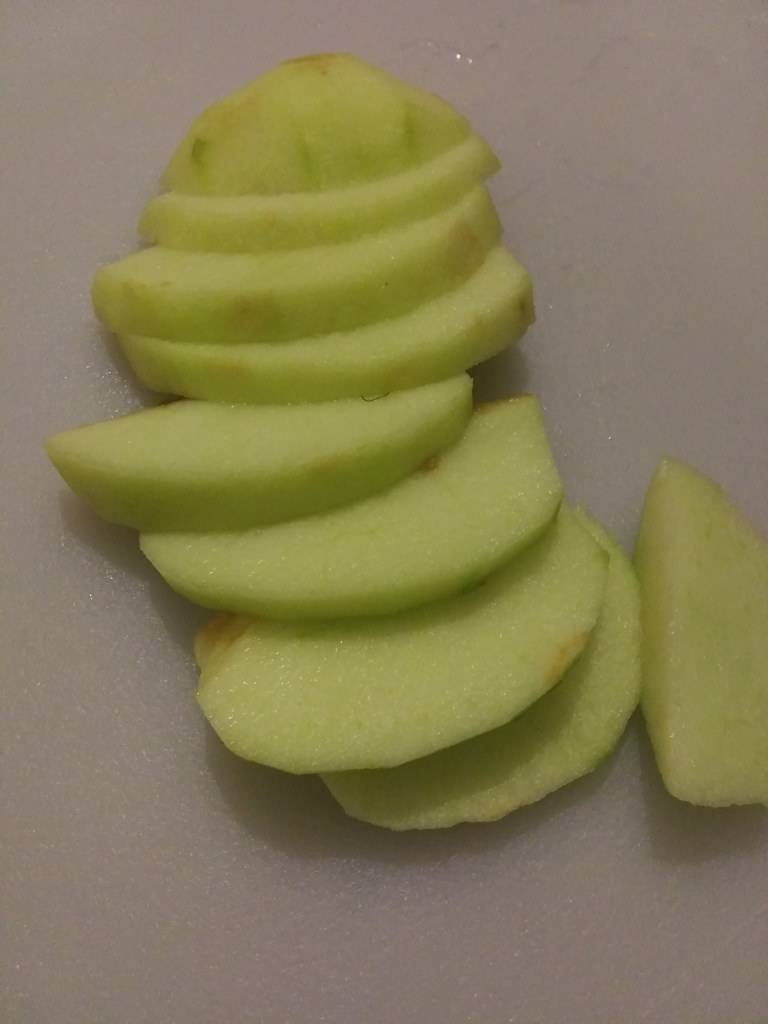
9 medium apples, peeled, cored and sliced
3 tablespoons lemon juice
1/2 cup water
8 tablespoons salted butter (1 Cube/ Stick)
4 tablespoons cornstarch
1 cup granulated sugar
2 1/2 teaspoons ground cinnamon
PEEL APPLESAPPLE CORERREMOVE THE APPLE CORESLICE IN HALF MAKE SURE ALL SEEDS AND CORE ARE REMOVED1/4″ SLICES1/4″ CUBESMELT 1 STICK OF BUTTERFRESH LEMON IS ALWAYS BEST IF YOU CANJUST USE THE PEELER TO MAKE A SLITSQUEEZE 3 TABLESPOONS OF LEMON JUICEADD INGREDIENTS ADD MORE INGREDIENTS AND STIRLET INGREDIENTS STAND FOR ABOUT 5 TO 10 MINUTESONCE INGREDIENTS ARE MIXED you can place them in pie shell or go to the next step cooking for 10 minutes for empanadas or small tarts.PLACE POT ON THE STOVE FOR 10 MINUTES AND REMOVE AND LET COOL
Peel apples and remove core. Cut in Half and slice length wise 1/4″ thick,, after cut into 1/2 inch pieces.
Melt butter in saucepan remove pan from heat
Add lemon juice, sugar, cinnamon, cornstarch and water. Stir together until all is mixed. I let it sit for about 10 minutes so the cornstarch and sugar have a chance to dissolve really good.
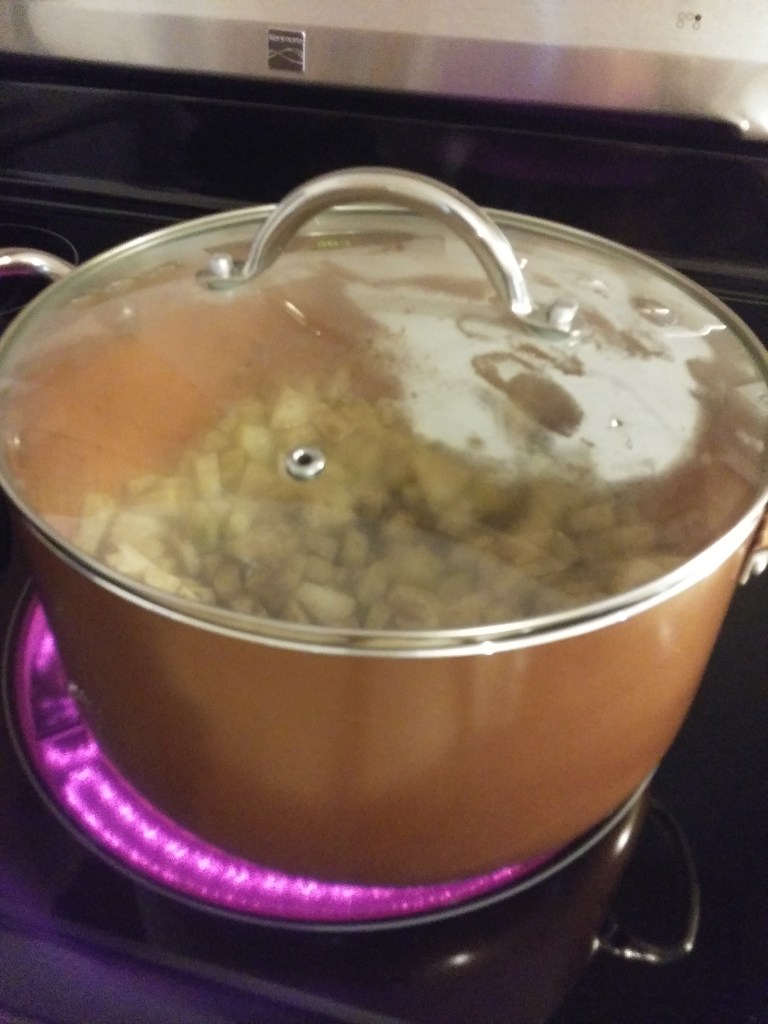
At this pointif you are baking a pie just add the apple mixture into the pie shell and cover with top crust, pinch, make your slits and bake.Continue for empanada or small tarts that only bake for 10 to 20 minutes only.
Bring covered pot to a boil and turn to medium heat. Simmer for 10 minutes while stirring frequently or until apples are al dente soft. Still Firm
Remove from heat and let cool. At least 2 hours, better if over night.
You can make this a few days ahead and refrigerator. Great to prepare and can it.You can also freeze the cooked mixture.
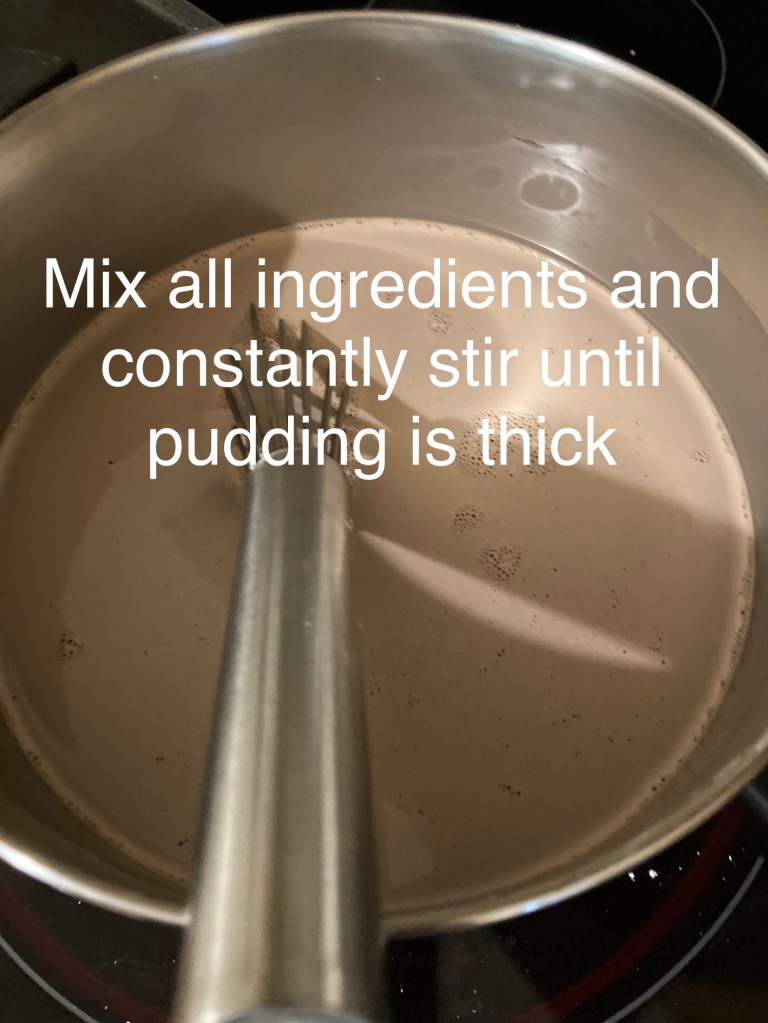
Combine the water, salt, sugar, yeast and 2 cups of the flour to your Kitchenaid mixing bowl.
Set mixer speed to 4 and mix well. Add in the flour about a half a cup at a time, mix for a minute or so and add more flour until the dough comes together and doesn’t stick to the bowl.
The dough should form a ball on the dough hook. It may become sticky after a few minutes of kneading so keep the flour handy to add more if necessary.
Knead for 8-10 minutes. The final dough should be firm and elastic and a little sticky to the touch.
Form the dough into a ball and place the dough in a greased bowl.
Cover the dough with a towel or cloth and leave in a warm place for about an hour.
Remove dough from bowl onto a smooth counter that has a little flour on top to keep the dough from sticking to the counter.
Divide dough into 10 equal balls. For oval shaped rolls, roll the balls between your palms for about 5 seconds to make a cylindrical shape, tapering slightly at the ends.
Cover and let rise again for about 30 minutes.
Preheat oven to 375 degrees and brush each dough ball with egg whites.
Using a bread knife, make a cut down the length of the roll about 1/4 inch deep. Bake for about 30 minutes, let cool and enjoy.
They may also be wrapped well and frozen for later use. It’s better to bake the rolls as needed to keep the freshness.
A traditional Mexican cake. Tasty almond flavor. Great for any occasion.
Experience Level: Easy to Moderate
Prep Time: 20 minutes
Cook Time: 40 minutes
Serves: 8
Ingredients
1-¼ cup Almonds
13 Tablespoons Unsalted Butter
1 cup Sugar
3 whole Large Eggs
1 teaspoon Vanilla Extract
1 teaspoon Almond Extract
½ teaspoons Salt
1 teaspoon Baking Powder
½ cups All-purpose Flour
¼ cups Confectioners Sugar, For Dusting
Preparation
Line the bottom of a 9″ cake round or spring-form pan with parchment paper and spray the paper and the sides of the pan with cooking spray. Preheat oven to 350 F.
Place the almonds in a food processor and pulse until the nuts are the consistency of coarse meal.
Using a stand mixer or hand mixer, cream together the butter and sugar until light and fluffy. Beat in the eggs and extracts. Set aside.
In another bowl, mix together the salt, baking powder and flour, then add it into the butter mixture and mix until just incorporated. Fold in the almond meal and pour the batter into the cake pan.
Bake in a preheated 350 F oven for approximately 40 minutes (begin checking at 30 minutes) until a cake tester inserted in the center of the cake comes out clean. Remove cake from the oven and allow it to cool before removing it from the cake pan. Dust the top with confectioners’ sugar and serve.
Try serving a scoop of Mocha or Chocolate Fudge ice cream along side a slice of Torta De Cielo.
Learn about the health benefits of prunes, especially women. It’s to your advantage.
How can you just have 2… Irresistible and Good For You.
Forget the stigma about prunes. They are Yummy Plump dried plums to snack on or to make jams and syrups. We know how to use prunes in recipes! So, we’ve added a couple of our most frequently used recipes.
Nature’s sweet nutritional goodness. Prunes offer fiber, with only 100 calories per serving. On a diet? Prunes help to keep your tummy feeling full for longer.
Prunes can contribute to good health in so many ways! In fact, adding a serving (1/4 cup or 40 grams) of prunes is a healthy part of a balanced daily diet.
Prunes and Plums may have a fantastic way of protecting the heart. They have been studied for the potential to reduce blood pressure and cholesterol levels. Which as you know are major risk factors for heart disease.
Prunes are low on the glycemic index at just 291 which means they raise the glucose (sugar) levels in your blood slowly, to help avoid spikes in your blood sugar levels and keep your appetite at bay.
Prunes contain the mineral boron, which can aid in bone health and help with osteoporosis 2.
Prunes contain potassium, an important mineral that ensures proper functioning of the heart and nerve responses throughout the body.
Prunes contain vitamin A, which is essential for healthy vision.
Prunes contain manganese, iron, and plant phenolics, which may help protect the cell membranes from free radical damage.
Prunes are a good source of both soluble and insoluble fiber. Plus, they are a trusted way to support the digestive tract.
Numerous studies show that prunes support bone health in postmenopausal women. Prunes contain micronutrients including potassium – a mineral associated with a decreased risk of bone loss and osteoporosis. Prunes also contain magnesium, which is important for bone structure, and vitamin K, which plays an important role in bone mineralization. Additionally, prunes are filled with plant-based compounds called polyphenols, which promote bone health by reducing bone mineral loss.
GLUTEN FREE
NO ADDED SUGAR
Great Snack for Dieters and Diabetics
There are several brands to choose from….. Sun Maid, SUNSWEET, Mariani and most store brands are very good also.
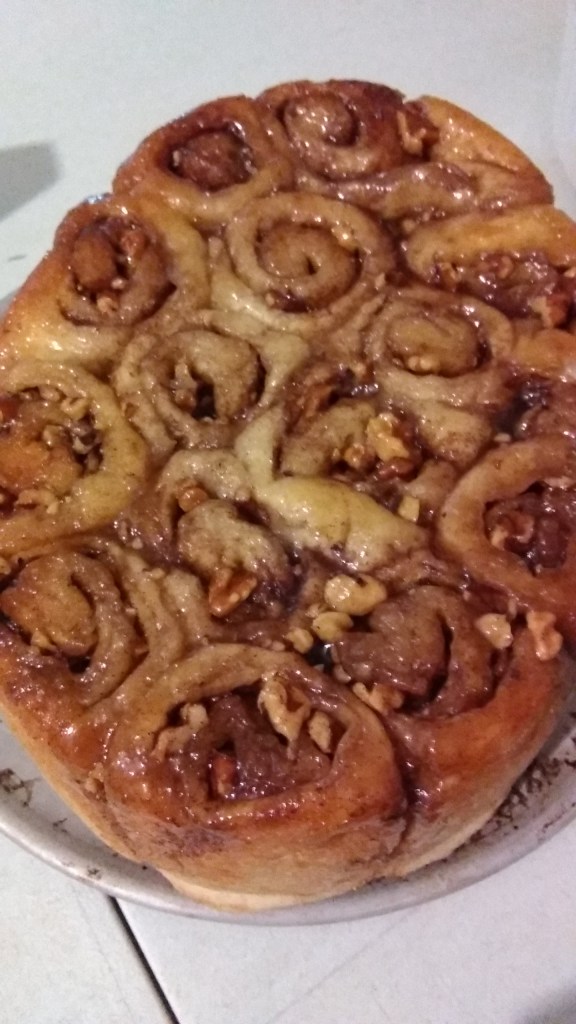
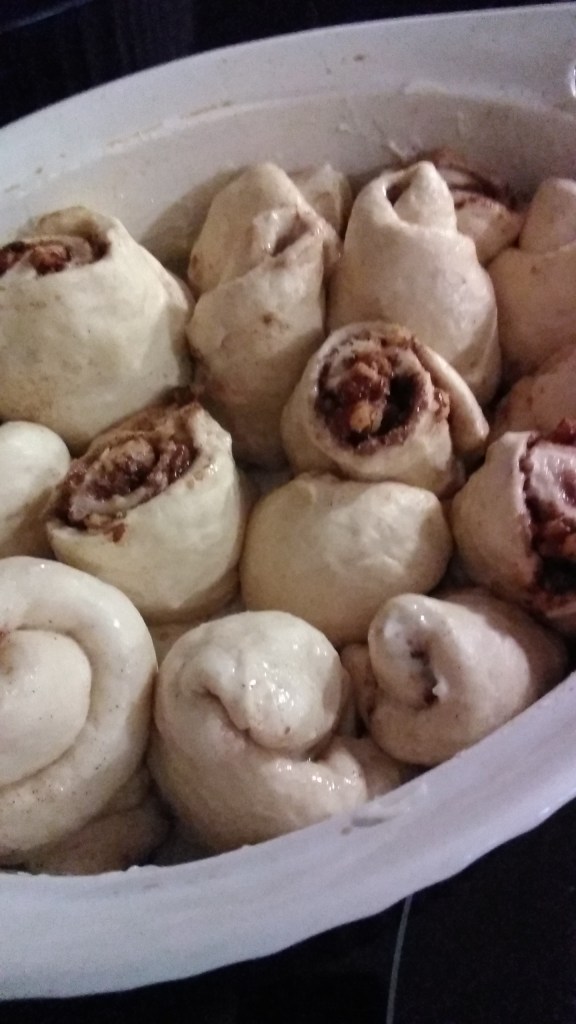
Cinnamon Rolls with Walnuts You can make this recipe in no time. Very easy and all so yummy.
By Orgnat Life
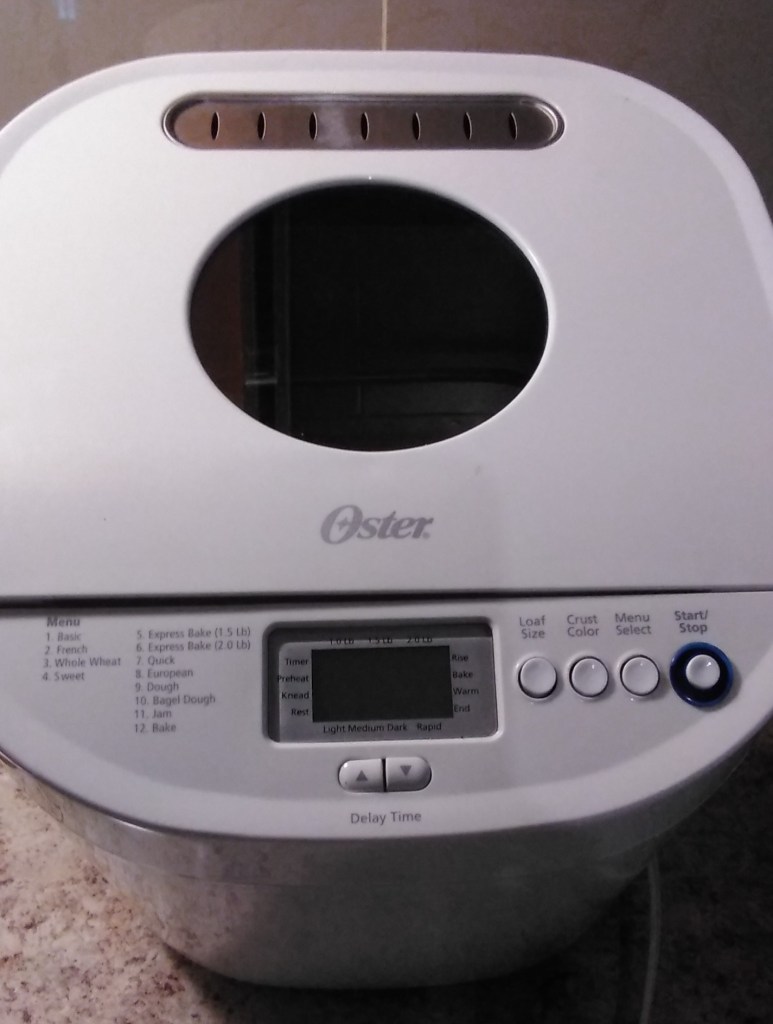
This yummy recipe is so simple a beginner could achieve 5 STARS first time. Wait there’s is an “IF”.. That is, if you have a bread maker. Most of the models make dough.
I always encourage everyone to get a bread maker. If you are going to make bread and rolls regularly, let the bread maker do the hard work for you.
You can purchase Bridgford Frozen dough at the store, but that defeats the purpose of making your own… NO PRESERVEATIVES… So which ever you choose to fit your life style.
This recipe makes 1.5 lb of dough or 15 large rolls. This is a basic dough recipe for your creative adventures in baking rolls and breads.
Level: Intermediate Yield: 12 servings Total Time: 2 hours 30 mins Cook Time: 30 minutes
Utensils: Bread Maker, rolling pin or a sturdy water glass, measuring cup, measuring set, 2 spoons, sharp knife, 13″ x 9″ pan and something to roll your dough out on. I use a large pizza pan with a small rolling pin.
Dough Recipe If you are using a bread maker place ingredients in container as follows. ⦁ 1 cup Water ⦁ 4 tablespoons Butter cut into tiny pieces ⦁ 1 and 1/2 teaspoons Salt ⦁ 3 cups Unbleached Flour (regular if that is all you have) ⦁ 1 tablespoon sugar ⦁ 2 teaspooons active dry yeast Set menu on bread amker to dough. Depending on your bread maker 90 minutes approximately
If you are using frozen dough it will take about 60 to 90 minutes to thaw. Follow directions on package. You can thaw the dough out in your refridgerator over night if baking in the morning. Bring the dough to room tempreture. Once your dough is ready you can follow the directions below.
Ingredients for Filling ⦁ 1 to 1.5 sticks Butter ⦁ Sugar ⦁ Cinnamon sprinkel to taste ⦁ Walnuts (finely chopped)
While you are waiting on your dough, remove 1.5 sticks of butter from refrigerator so it can soften up. After the butter is soft use up to 1/4 stick of butter and heavily spread butter on pan bottom and sides with a spoon. Cut up 1 to 1 1/2 sticks of cold butter into small pieces and cover the bottom of your pan evenly with the butter. Take 1/4 cup of sugar and lightly sift over the butter. Set that to the side.
As soon as your dough is ready / proofed take it out and knead it one more time. I butter my hands and knead without flour. ⦁ Split it into 4 even sections. ⦁ Roll out 1 section so it is about 1/8″ thick or less. No bigger or you will end up with a doughy roll. ⦁ Butter the dough slightly. ⦁ Sprinkel 3 tablespoons sugar over dough. ⦁ Sprinkel your cinnamom. I like mine a little heavy but I like cinnamon. You can experiment with each section you roll out so in the end you will know what is a good coverage of cinnamon for you. ⦁ Sprinkel your fine chopped Walnuts to taste or make without nuts. ⦁ Take the dough at the edge and start to roll the dough up into a log shape and cut into 3. Place into your pan.
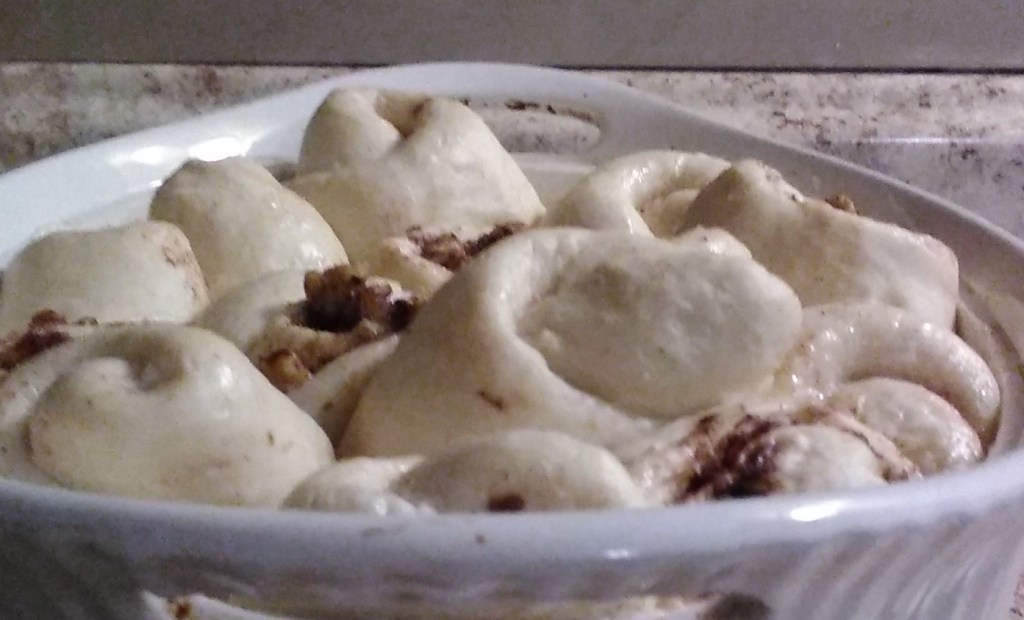
Leave at least 1″ more or less in between each roll. Cover with dish cloth and let rise for 30 minutes or until double to triple the size.
Preheat oven to 350′ degrees prior to cooking Make sure you have at least 4″ inches of room around the rolls, if not, lower the rack.
Cook for 30 minutes in the center of the oven.
Take out of oven let set for 5 minutes. Take a plate or plastic container to size and place on top of pan and flip it over. Leave the pan on top for 5 minutes. Lift pan off and let cool for 15 to 20 minutes.
ENJOY
Please Leave your comments below and let us know how you liked it.
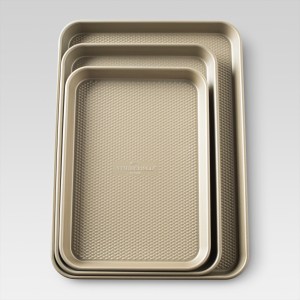
The THRESHOLD COLLECTION of baking sheets are now on sale.
DO NOT BUY THEM
The “GOLD” Paint came off of my Large baking sheet after cooking plain chicken thighs. This was the first time I had used the large pan. I had already used the other 2 smaller ones, baking fish sticks, brownies and bread on the other and it was fine.
TARGETS DECRIPTION:
This Gold Set of 3 Cookie Sheet from Threshold is a must-have for your kitchen. The steel cooking surface and diamond pattern are not only practical for baking, but also add strength and durability. The stylish gold shade makes it look really great when you set it on your kitchen counter or dining table.
Features: Rectangle (shape)
Number of Pieces: 3.0
Dimensions (Overall): 1.06 inches (H) x 12.0 inches x 17.0 inches (D)
Ingredients:
1 medium ripe banana
1 cup shredded carrots (see note below)
1/4 cup applesauce, unsweetened or a fresh apple pureed
1/8 cup water (you may need to add additional 1/8 cup water)
1 1/2 cups whole wheat flour
1 cup rolled oats
Instructions:
Preheat oven to 350° F
Lightly spray a baking sheet with non-stick spray.
Mash the ripe banana in a small bowl. Grate the carrots, and mix with the banana. Then pour in the applesauce and water. In a medium bowl, whisk together the flour and oats. Make a well in the center of the dry ingredients and pour in the carrot mixture. Stir until thoroughly combined. Roll into marble size balls, flatten with fork to 1/2 inch thickness. Place on the baking sheet and bake for 25 minutes. Let them cool overnight in the oven.
Sometimes we need to open the windows on our boxes and look out. If we are brave enough we can open the door and step out of the box.
We have been programmed into staying within our boxes. It’s safe and comfortable and society says it’s “the RIGHT thing to do”. With scientists revealing more treatments involving alternative medicine, it’s time we took a look outside. Every day new technology and research is being accomplished you won’t hear about in main stream news.
The struggle has been hard with Alternative Medicine research and technology being suppressed for so many years. Throughout this time we have been told to think it’s a hoax, these doctors are quacks and they are just out to take your money. Yes, in some cases I will agree. But there are real Holistic/Alternative treatments that work and honest doctors providing the treatment.
How do you think the Chinese survived for so many years? Still to this day they rely on Chinese Medicine, herbs, roots and other natural ingredients to make medicines.
If you think about it, if we all just understood how pharmaceutical companies derived their medicines. It would be a financial downfall for the pharmaceutical companies. If only we would ALL look outside that door. We could really change health care as we westerners know it.
For an example is the Medical Marijuana medicine. Big Pharmaceutical companies have lobbied against any form of legalization. They are at their wits end because they cannot patent marijuana and they cannot come up with the absolute formula that works the same as the real thing.
Marijuana is a plant that grows natural on earth and goes back in time as a healing medicine. Pharmaceutical CBD and THC therapies are synthetic.
There are plants on earth that cure illnesses. This is how Big Pharma came up with all the BIG $$$ synthetic medicine, but one drawback is Synthetics come with all the side effects… Some medicines have over 50 pages of CAUTION SIDE EFFECTS.
Natural, there is nothing like the real thing to heal the human body.
I use to be very skeptical, until I actually experienced alternative medicine work. Not cancer but other illnesses. If I would have never opened that door and stepped outside, I would have stayed closed minded to alternative remedies and cures.
I just wanted you to know my eyes are wide open and looking at things differently these days, that’s all. Let’s Explore Our World and Everything It Has To Offer…
The High Dose Oral Vitamin C Protocol for Cancer (and Nearly Every Other Ailment)
I’m really excited about this post because I’m sharing some really cool stuff about Vitamin C that many people do not know. Or maybe I’m wrong and everyone already knows this but me… We’ll see.
This is a powerful anti-cancer protocol and even if you don’t have cancer, you can use this method to determine how much toxic stress is going on inside your body and how high doses of Vitamin C could dramatically improve your health.
Ok so we all now that Vitamin C (asorbic acid) is good for you right? The body doesn’t produce it, so it has to come from food.
You’ve probably also heard that a severe Vitamin C deficiency leads to scurvy. Early symptoms of scurvy are malaise and lethargy. That’s basically a “general feeling of being unwell” along with tiredness or exhaustion. (Does this sound like you?) After a few months comes shortness of breath and bone pain. Further down the road is muscle pain, skin sores, gum disease, loose teeth, wounds not healing, dry mouth, dry eyes, and emotional problems. In the late stages comes jaundice, edema, fever, convulsions, and eventually death.
Sounds fun right? Fortunately scurvy can be CURED with lemons, limes, oranges, and any other Vitamin C containing food.
Don’t Forget to watch the video below
Here’s where it gets interesting…
The cure for scurvy was first published in 1617 in The Surgeon’s Mate by English military surgeon John Woodall. And it was completely ignored by the medical community.
In 1753 (136 years later) naval surgeon James Lind published his discovery in, A Treatise of The Scurvy, which was also ignored. The medical establishment insisted that the testimonials of eating citrus fruit to reverse scurvy were merely “anecdotal” and not based on “scientific evidence”. Sound familiar?
Fortunately James Lind persevered and about 50 years later citrus fruit was finally accepted and used for the prevention and treatment of scurvy on sailing vessels. So, in summary:
The cure for scurvy was ignored for nearly 200 years after its discovery.
Nutrition and natural therapies are still ignored modern medicine. In fact I’d be willing to bet that if you went to see a doctor with some of the symptoms of scurvy that I listed above, you be subjected to a barrage of expensive tests, misdiagnosed, prescribed pharmaceutical drugs, and subjected to treatments for some other disease. This happens all the time. Earlier this year my good friend Tony was told that he probably had cancer or AIDS, turns out it was viral pneumonia. Can you imagine?
But I digress… Let’s get back to Vitamin C.
Here are some common whole food sources of Vitamin C:
Oranges, Kiwi, Canteloupe, Papaya, Strawberries, Brussels Sprouts, Broccoli, Cauliflower, Cabbage, Kale and Peppers.
“Super foods” with the highest concentration of Vitamin C on planet earth are:
Camu Camu Fruit, Amla (Indian Gooseberry), and Acerola Cherries. In that order.
Vitamin C supports nearly every system in your body: your adrenals, your immune system, your cardiovascular system, and more. Perhaps the most important is that it is a neutralizer of free radicals.
There’s been tons of ground-breaking research on high-dose Vitamin C’s powerful healing and anti-cancer effects by the likes of Fred Klenner MD, Irwin Stone, Linus Pauling, and Ewan Cameron. I don’t have time to get into their stories but I wanted to a least give credit where it’s due. Google them in your spare time. There’s a fascinating Vitamin C phenomenon that most of us don’t know about.
The sicker and/or more toxic you are, the more free radicals you have in your body, and as a result, the more Vitamin C your body will absorb and use. The body keeps a small reserve of Vitamin C available for use when there is increased internal demand, but when you are sick this is quickly depleted.
You may have also heard (or experienced) that if you take too much Vitamin C by mouth you get the runs, aka “chach” which is our family’s abbreviation (and code word) for
“Diarrhea Cha Cha Cha”.
A healthy person can take anywhere from 4-15 grams (4,000-15,000 mg) of Vitamin C in a 24 hour period without getting the runs, but a sick person can tolerate anywhere from 10-20 times more. I’m talking even as much as 100-200 grams per day by mouth.
Have you ever taken Vitamin C when you had a cold and it didn’t help? This is probably because you didn’t take near enough.
Here’s where it gets ridiculous… If you ate something that contained “100% of the USRDA (Recommended Daily Allowance ) of Vitamin C” that seems pretty good right?
It’s not.
The USRDA for Vitamin C is only 75 mg. That’s MILLIGRAMS. A normal healthy person can absorb and use between 4,000-15,000 milligrams per day. So the USRDA is way off on this one. 75 mg is basically what someone decided is the absolute minimum amount to keep you from getting scurvy. This is not an amount that promotes health and optimal body function.
One orange has about 150mg of Vitamin C, about 2 times more than the USRDA. And 1 teaspoon of Camu Camu Powder has about 15 times the USRDA of Vitamin C!
Even though you may not have scurvy, I think it’s safe to assume that many of us may not be getting enough Vitamin C in our diets, the lack of which could be a contributor to
a) feeling lousy or b) serious disease.
High Dose Oral Vitamin C Therapy is taking the maximum dose your body can tolerate before you get the runs. This requires finding your threshold and then backing off a little bit for your daily dose. The clinical term is “titrating to bowel tolerance”.
As some of you know, one of the therapies I used to help my body heal from cancer was Vitamin C IV Therapy, which is a common practice in the natural/alternative cancer treatment world. This involves sitting in chair in a practitioner’s office for two hours with an IV drip containing 50 grams or more of Vitamin C. And while this is a very effective method to get a massive dose of Vitamin C without reaching bowel tolerance and to promote healing in the body, it is time consuming and expensive. I was paying $120 a pop, cash money. And in order for it to be the most effective you need to do it 2-3 times per week for many weeks.
My friend Bill, who’s healing his prostate cancer naturally, turned me on to a simple do-it-yourself Oral Vitamin C Protocol that he was put on by an underground cancer treatment expert whose name I cannot use publicly. Bill initially reached bowel tolerance taking 60 grams per day. After two months his tolerance was down to less than 30 grams per day. That’s a very good sign.
The Vitamin C Toxicity Test & Protocol
This is something everyone should do. Now clearly no one wants diarrhea on purpose, but in this case it can give you some immediate feedback about your internal condition. And it’s super cheap to do!
The simple way to find your tolerance is to take 2-3 grams of Vitamin C powder or crystals (ascorbic acid) every two hours mixed in 8 oz of water. That will give you about 12-18 grams the first day. Make sure you keep track of your doses. Vitamin C powder is highly concentrated. 1 teaspoon is usually about 5 grams of Vitamin C.
The goal is to find your 24 hour limit, not your single dose limit.
The half-life of Vitamin C in the body is about 30 minutes. That means about an hour after you take Vitamin C, your body has used up most of it. So an important key to this protocol is to keep your body saturated with C all day. Dosing every 1-2 hours is ideal.
If you reach bowel tolerance in the first 24 hours, reduce the total dose by 20-25% and continue to take that amount every day as a maintenance dose (this may be for several days or weeks) until you reach bowel tolerance again at that level. Then reduce by 20% again and continue with that dose until you hit bowel tolerance, and so on.
It works the opposite of what you would expect because you don’t build up a tolerance. The healthier you become, the lower your bowel tolerance for Vitamin C will go.
If you reach bowel tolerance at 10-15 grams or less per day, you’re considered to be in very good shape health wise.
If you follow the steps above and do not reach bowel tolerance the first day, continue to up the dose each day until you get there. If you are seriously sick you may need to dose every hour or 1/2 hour as indicated in the chart below. As you get close to bowel tolerance you will get gassy and should have soft stool. That means you’re very close to your body’s limit and should reduce your dosage a bit.
Here’s a dosage chart from the late and legendary Dr. Robert Cathcart MD, who treated 9000+ patients with Vitamin C!
TABLE I – USUAL BOWEL TOLERANCE DOSES
CONDITIONGrams Per 24 HoursDoses Per 24 Hours
normal 4 – 15 4 – 6
mild cold 30 – 60 6 – 10
severe cold 60 – 100+ 8 – 15
influenza 100 – 150 8 – 20
ECHO, coxsackievirus 100 – 150 8 – 20
mononucleosis 150 – 200+ 12 – 25
viral pneumonia 100 – 200+ 12 – 25
hay fever, asthma 15 – 50 4 – 8
environmental and
food allergy 0.5 – 50 4 – 8
burn, injury, surgery 25 – 150+ 6 – 20
anxiety, exercise and
other mild stresses 15 – 25 4 – 6
cancer 15 – 100 4 – 15
ankylosing spondylitis 15 – 100 4 – 15
Reiter’s syndrome 15 – 60 4 – 10
acute anterior uveitis 30 – 100 4 – 15
rheumatoid arthritis 15 – 100 4 – 15
bacterial infections 30 – 200+ 10 – 25
infectious hepatitis 30 – 100 6 – 15
candidiasis 15 – 200+ 6 – 25
Something else worth noting in the above chart: If you are under chronic stress or engage in athletic activities like running, weight training, etc. you are likely to have an increased need for Vitamin C and your tolerance will be higher. Even if you are healthy.
Dr. Cathcart also notes that low dose vitamin c had basically no effect, but high dose vitamin c, when taken at 80-90% of bowel tolerance, produced a significant and dramatic reduction of symptoms in his patients.
Experiments
When I first tried this protocol a couple months ago I didn’t reach bowel tolerance until I got to around 34 grams. I worked my way up to taking 12 grams three times per day. I have no idea why my tolerance was that high. I workout 3-5 days per week which would increase my tolerance but perhaps I also had something going on internally… who knows?
Earlier this morning I took 7.5 grams and it produced bowel tolerance for me a couple hours later which actually interrupted my work on this post. Clearly my tolerance is down and if Dr. Cathcart is right, my internal health has improved.
Another one: My kids came home with colds from school two weeks ago. Then my wife got it. One morning I started to feel cold symptoms as well so I took 10 grams of Vitamin c. I felt great all day. Then close to bedtime I started to feel the symptoms again so I took another 10 grams. I did this every day for about a week. I would feel the symptoms in the morning, but I quickly crushed them with 10 grams of vitamin c. Some days I would take a dose around lunch time as well if I remembered. I was taking 20-30 grams per day for most of the week, I felt good, I was close to bowel tolerance, and the cold never developed. Since then, I’ve done this more times than I can count. Works every time.
What form to take?
Vitamin C comes in several different forms: pure asorbic acid and buffered with minerals.
Buffered C contains mineral salts like calcium asorbate, magnesium asorbate, and sodium asorbate. Buffered C is more alkaline but the excess minerals could be problematic if you are taking mega doses.
I compared three different types (buffered and pure asorbic acid) to see if they had different effects but my tolerance was basically the same for all three. Having said that…
Solaray Vitamin C Powder is 100% pure asorbic acid so it’s extremely tart and citric. Vitamin Shoppe Buffered C-Complex tastes chalky, not citric.
Thompson C Buffered Crystals is buffered with calcium asorbate, it’s citric but not as strong as the pure crystals.
Dr. Cathcart recommends taking pure asorbic acid for the high dose oral protocol. Dr. Thomas Levy recommends sodium asorbate. I think it makes sense to rotate between different types.
*After writing this post it was brought to my attention that most of the asorbic acid in vitamin C powder is made in China from GMO corn. If that is a concern for you, there are several brands of non-GMO vitamin C powders.
This is as easy as 1-2-3. Delicious moist and very tasty. It’s actually “To Die For”.
Prep 15 minutes
Cook 30 minutes
Ready In 45 minutes
“This is a delicious and easy blueberry cake to make with things that are usually on hand. My Aunt passed this down to me. I have made it with the glaze topping which makes this cake the “bomb”.
Ingredients
2 1/2 cups all-purpose flour
1 1/2 cups white sugar
1 tablespoon baking powder
1 teaspoon salt
1 cup milk
1/2 cup vegetable oil
2 eggs, beaten
2 teaspoons vanilla extract
1/2 teaspoon Lemon Zest
2 cups fresh blueberries
2 teaspoons all-purpose flour, or as needed
2 tablespoons butter, melted
2 tablespoons white sugar, or more to taste
Directions
Preheat oven to 375 degrees F (190 degrees C). Grease and flour a 9×13-inch baking dish or bundt pan.
Sift 2 1/2 cups flour, 1 1/2 cup sugar, baking powder, and salt together in a bowl. Add milk, vegetable oil, eggs, vanilla extract and lemon zest; mix into a semi-thick batter.
Toss blueberries with about 2 teaspoons flour in a separate bowl; fold into batter. Pour batter into prepared baking dish.
Bake in the preheated oven until cake is lightly browned, 25 to 30 minutes.
These are your Last Step’s and Options:
*Brush melted butter on top of cake and sprinkle with about 2 tablespoons sugar, Continue to bake until golden brown and a toothpick inserted in the center comes out clean, 5 to 10 more minutes.
OR
Omit the sugar topping and continue cooking 28 to 35 minutes or until toothpick comes clean. Apply Glaze after cake has cooled.. Glaze
1/2 cup powdered sugar
2 Teaspoons + Fresh Squeezed Lemon Juice (not to thick and not to thin)
1/2 teaspoon Vanilla Extract
1/4 teaspoon + Fresh lemon zest (Stir in after mixing)
Mix together until super creamy. Actually I like to use my whip to make it creamier.
Drizzle over the entire cake with a spoon. It’s The “BomB”
Makes 8 large, big-topped muffins / 10 standard muffins / 20-22 mini muffins
All you need is one bowl. This recipe is so easy when we’re in the mood for something other than cereal, we’ll skip pancakes and make these for breakfast instead.
Since most standard muffin tins have 12 muffin cups, if you plan on making the larger muffins, we recommend adding 1 to 2 tablespoons of water to the empty cups. This way the cups with water will heat up at the same rate as the cups with muffin batter, helping the muffins cook evenly.
You Will Need
1 1/2 cups (195 grams) all-purpose flour
3/4 cup (150 grams) granulated sugar, plus 1 tablespoon for muffin tops
1/2 teaspoon kosher salt
2 teaspoons baking powder
1/3 cup (80 ml) neutral flavored oil; canola, vegetable and grape seed are great
1 large egg
1/3 – 1/2 cup (80 ml – 120 ml) milk; dairy and non-dairy both work
1 1/2 teaspoons vanilla extract
6 to 8 ounces fresh or frozen blueberries; see note below about frozen berries (about 1 cup)
Directions
Prepare Oven and Muffin Cups
Heat oven to 400 degrees F.
For big-topped muffins, line 8 standard-size muffin cups with paper liners. For standard-size muffins line 10 muffin cups. Fill the remaining cups with 1 to 2 tablespoons of water to help the muffins bake evenly.
Whisk the flour, sugar, baking powder, and salt in a large bowl.
Add oil to a measuring jug that holds at least 1 cup. Add the egg then fill the jug to the 1-cup line with milk (1/3 to 1/2 cup milk). Add vanilla and whisk to combine.
Add milk mixture to the bowl with dry ingredients then use a fork to combine. Do not over mix. (The muffin batter will be quite thick — see note below for more details). Fold in the blueberries.
Divide the batter between muffin cups. (If making big-topped muffins, the batter will come to the tops of the paper liners). Sprinkle a little sugar on top of each muffin.
Bake muffins 15 to 20 minutes or until tops are no longer wet and a toothpick inserted into the middle of a muffin comes out with crumbs, not wet batter. Transfer to a cooling rack.
After muffins have cooled, place them in a plastic bag, seal, and store at room temperature for 2 to 3 days. To freeze, wrap them tightly in aluminum foil or place them in freezer bags. Freeze for up to 3 months.
Tips
You can make these with fresh or frozen blueberries – if you use frozen, do not thaw the blueberries.
For mini muffins, the baking time will be less — keep an eye on them while they bake and expect them to require 9 to 11 minutes.
Batter Thickness: The batter should be thick and “scoopable” — not runny and not dry or extra thick like dough. If the batter is too runny, add flour, a tablespoon at a time until correct consistency. If batter is dry or too thick, add milk, a tablespoon at a time until correct consistency.
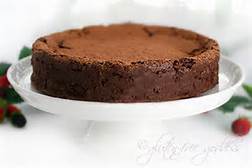
A deep dark chocolate cake recipe. Just in time for Valentine’s Day. And the best part? It’s not only gluten-free, but vegan as well. And it’s technically a flourless chocolate cake (which for some retro-fueled reason still conjures the term sexy thanks to Sarah Jessica Parker).
In full disclosure (hey, I vet my recipes okay?) I added a scant amount of buckwheat flour to help it set up without eggs, but buckwheat isn’t technically a grain, is it? More of a groat, a fruit kernel. In fact, buckwheat is a cousin to sorrel and rhubarb. I could try to impress you with shout-outs to the Polygonaceae family, dropping botanical distinctions like actinomorphic and calyx as fast as Madonna drops post-Guy Ritchie boyfriends, but I’d rather leave all botany urges behind and get back to chocolate and celebrating the dream of true love.
One important lesson I’ve learned after three years of blogging original recipes and building an on-line audience which insists I keep playing in the kitchen developing recipes that are not only gluten-free, but often dairy-free (and those voracious vegan readers- they’re sprouting up everywhere these days, not to mention the increasing number of devoted mothers writing in daily to request soy-free, and nut-free recipes for their food sensitive kiddos) is to experiment.
The challenge for a gluten-free (or wheat-free) vegan is how to create certain flourless and creamy recipes without eggs. The answer- in every vegan cookbook I’ve ever perused- is tofu. Vegan cooks love their tofu- tofu custards, tofu ice cream, tofu pumpkin pies, tofu stuffed lasagna. Tofu works. It lends an egg-free recipe body and silkiness. But what if- like so many of us ingredient challenged individuals- you are allergic to soy? What then? Then, my friend, tofu is no magic bullet. Tofu is the enemy. In fact, I am sorry to tell you, tofu sucks.
What if, I started to imagine, I melted Belgian dark chocolate and tweaked my pumpkin pie to turn it into a flourless chocolate cake? (See how my fevered little associative thinking brain works?) I could use pumpkin for the eggs/tofu. Why not?
So send me a kiss when you’ve baked this chocolaty confection. And most of all, be sure to kiss the one you love. Young and old. Seasoned and brand new. Straight, gay and in between. Celebrate love in all its generous forms this Valentine’s Day.
And don’t forget to love yourself.
Because that, Babycakes, is where the seed of true love begins to grow.
Vegan “Flourless” Chocolate Cake Recipe
By Karina Allrich August 2009. Febuary 2009.
You can make this cake batter in a Vita-Mix or a food processor, following the method explained in my recipe for Flourless Chocolate Cake (the recipe with eggs and butter). Easy. Easy.
First:
Brew 1/2 cup very hot, double strong coffee or espresso (decaf works); or use 2 rounded tablespoons of instant coffee in 1/2 cup freshly boiled water. Sweeten with stevia, to taste (or sugar).
Preheat the oven to 350ºF. Line the bottom of a 9-inch Springform pan with greased parchment paper.
Ingredients:
6 ounces unsweetened dark chocolate, broken into pieces
Place the chocolate pieces in the Vita-Mix (or a high speed blender container); add the hot coffee and heated hemp milk. Cover tightly- use caution with hot liquids. Turn on the mixer to high. Blend until chocolate pieces are melted. Add the vanilla extract, and pumpkin puree. Cover. Blend a minute.
Add the brown sugar, buckwheat flour, tapioca, egg replacer, xanthan gum, sea salt, baking powder, cinnamon or ginger. Cover. Blend on high for a minute. Turn it off (unplug it for safety if you have kids nearby). Open the top and using a plastic spatula scrape down the sides if any flour is sticking to the sides- if you’re using a food processor instead, do the same. Cover. Plug back in.
Blend for another minute or two until the batter is creamy and smooth.
Pour the batter into the prepared cake pan; scrape all the batter out with a smallish silicone spatula. Smooth the top evenly.
Bake in the center of the oven until the cake is firm- anywhere from 50 to 60 minutes. Here at almost 7,000 feet it baked in 57 minutes. Check the cake sooner if your experience indicates that flourless cakes and pies bake up quicker than 50 minutes; also, if your experience is that these types of recipes bake longer- check at 50 to 55 minutes; and follow your instincts. The center will be the last to cook- it shouldn’t be wiggly.Cool the cake on a wire rack. The top will collapse a bit- no worries. When the cake has cooled, cover and chill it at least two hours before serving. The longer the better.
Chilling creates a dense fudgy cake. I froze some pieces and tried one ice cold from the freezer- it tasted like a Fudgsicle.
Serve with chocolate sauce, a few ripe berries, a dusting of confectioner’s sugar, or a few fresh mint leaves. Serves 8 to 10.
We enjoy sugary treats in moderation, don’t we? Gluten-Free Goddess advises consuming no more than 2 tablespoons of sugar a day.
For substitutions, please see my guide to baking with substitutions here.
You only need three ingredients to make these white chocolate treats. They’re great for parties or to give as gifts.
Oreo Truffles cookies
Cookie Truffles
Ingredients
1 11.9 ounce package chocolate sandwich cookies with white filling (30 cookies), finely crushed
1 8 ounce package cream cheese, softened
1 pound white baking chocolate, coarsely chopped
Directions
Line a large baking sheet with parchment, waxed paper or foil; set aside.
In a large bowl combine crushed cookies and cream cheese. Beat with an electric mixer on low speed until well mixed.
Shape mixture into 1-inch balls. Chill or freeze until firm.
In a large saucepan cook and stir white chocolate over low heat until melted; cool slightly.
Dip each ball into melted white chocolate; let excess drip back into pan. Place dipped truffles on the prepared baking sheet.
Chill truffles about 1 hour or until firm.
Store, covered, in the refrigerator up to 1 week or freeze up to 1 month..
Well that could be a long list or a very short one. The bigger BOXED coffee shops as Star$$$$’s really does not appeal to me. Boring, run of the mill. It’s the smaller shops that actually make a good cup of coffee, or maybe it’s the atmosphere that makes it taste so good. Either way the atmosphere is comfy and inviting. Big oversized chairs to relax in and read a book or chat with others while you sip that wonderful drink.. Sounds like home.
Speaking of terminology.. Lord give me a break. If one more establishment comes up with another tongue twisting drink that takes 5 minutes to order and another 20 minutes to make, I will have to stop altogether. What ever happen to the good Old days when a cup of Joe was just that a cup of joe?
Well we are about to find out… When espresso came to America and where did espresso come from originally? Italy you say… NO.
Espresso first appeared in Italy in the early 20th century. Coffee had already become a necessity to Italian daily life thanks to North African Muslims who brought it through Venice’s ports during the Renaissance. We owe much of the mystique coffee to Venetian merchants who charged wealthy patrons hefty sums to try out this newfangled drink when the first coffeehouses opened in the 1640’s.
Fast forward about 200 years and we find business man Luigi Bezzera tinkering away with this coffee pot to find a way to make coffee faster. In 1903, Bezzera owned a manufacturing business and was frustrated by the time-consuming process of brewing his own coffee at home each morning.
He soon found that adding steam pressure to the machine not only cut down on the brewing process but also produced a stronger, more robust cup of coffee. This new quick-brew process drew out the coffee bean’s best qualities but somehow avoided over extraction.
Bezzera immediately named his invention the “Fast Coffee Machine”. Since the word ‘espresso’ means fast in Italian, the name of the beverage the machine produced was quickly shortened to what we know today.
Unfortunately, Bezzera wasn’t as talented at marketing and sales as he was at engineering. In 1905, another businessman named Desidero Pavoni purchased the machine’s rights from Bezzera and had it patented.
Nowadays you don’t have to travel to Italy to experience Bezzera’s handiwork. The recent boom in espresso’s popularity has brought this Italian treat to every mall and street corner. Next time you decide to pick one up, take a moment to think about the more than 100 years of history inside your cup.
BREWING…
There are several ways to brew the black magic. Easy, put the water in and walk away to grinding, tampering, brewing and mixing the syrups to get that special taste.
For myself I threw out the Drip coffee maker and opted for the french press carafe. To have a rich full bodied aroma wafting through the house is like a beautiful melody running through your mind over and over.
I still say the best was the Percolator, back in the day. I can remember my grandma making coffee on the stove. Watching the coffee going up into the glass bubble on top and back down again, becoming darker in color each time it reached the bubble. Then the electric percolator my mom used was the highlight of the 60’s. Same technique just plug it in and watch it go.. No more standing by the stove and waiting for that perfect cup of coffee.
The Automatic drip machine came into the light. Wow everyone thought this was the BOMB.. Yes it gave you your pot of coffee in 5 minutes. But where was that rich wafting aroma? Gone with the 5 minute cup.
Then we step up to the home brew station for espresso. Ohh, what magic we have in our possession. Soon every house had an espresso machine big and small.
The latest is the One Cup Brew machine. Bringing you pre-made espresso in 50 flavors with no hassle or mess. Every day is a coffee rainbow.
Have fun and try a different blend and technique today…. You might be surprised at the difference a “Technique” actually makes.
Don’t forget about the health benefits of coffee. Black Coffee, not that candy coated crud or Super Hype added extract.
Please!!! Regular black coffee is just fine for me.
Why should you cook for your pets? by Dr. Karen Becker, VM
Feeding your pets a healthy diet is simple and easy.
It’s like cooking for yourself except your leaving out the salt and a few other ingredients. Whats great about cooking your pets meals is you know what’s exactly in there. Your using beef, chicken, turkey and lamb fresh from the store. No processed precooked meat in a can.
Human Grade Food: It’s Not Just for Humans
Unless the commercial dog or cat food you’re buying is made with human-grade ingredients, you are feeding your pet rendered protein. Rendered meat is essentially pieces and parts of this animal or that — there’s really no telling. This low quality protein is less than desirable nutrition for your pet. You don’t know what country the meat came from or if this meat came from sick, road kill or euthanized animals. . . This can be an issue since other countries do not have the same regulations for human consumption.
Unfortunately, commercial pet food made entirely with human-grade ingredients is usually at least three times as expensive as food containing crude protein. This is one of the main reasons for switching your pet to a homemade diet. You have complete control over what goes into your dog’s or cat’s mouth, and you can insure you’re feeding high quality, human-grade protein and not the crude, pieces-and-parts variety.
If you would like to read the entire article CLICK HERE
If you find you have had to much fun in the kitchen this winter, you need to plan ahead for some exercise.
Yes, that dirty word after winter we all hate to hear. Trust me I am dreading climbing aboard that treadmill or even lifting my mini weights. Skipping rope has skipped right out of my my mind. I am still in cookie and candy mode. Just make sure you continue to take your daily dose of ACV. This will help you keep some of those cookie tires off of your waistline.
You can also keep up on your fresh veggies. Try a new kick and pickle some carrots, cucumbers, onions and Italian seasonings with ACV. Check out my pickled cucumbers recipe.
Pumpkin Rolls for Thanksgiving and Christmas… Yummy
Chef Sherrie Angel “Slam Dunks” Thanksgiving this year with her Pumpkin Dinner Rolls. Creamy smooth texture that melts in your mouth. Bite after bite you can taste every spice layered across your pallet correctly.
Let’s not forget about the star of the day. Juicy seasoned to perfection turkey with chicken sausage gravy & all the sides to complete the meal.
I made my dough in the bread maker, but i have added instructions for making it by hand.
Risen twice and then baked to perfection. But we will give the directions for old school mixing in a bowl.
Chef Sherrie Angel… Rocks the Kitchen with Pumpkin Rolls
INGREDIENTS
1/2 cup warm Whole Milk
1/4 cup Honey
1/4 cup salted Butter
2 1/4 teaspoons Active Dry Yeast
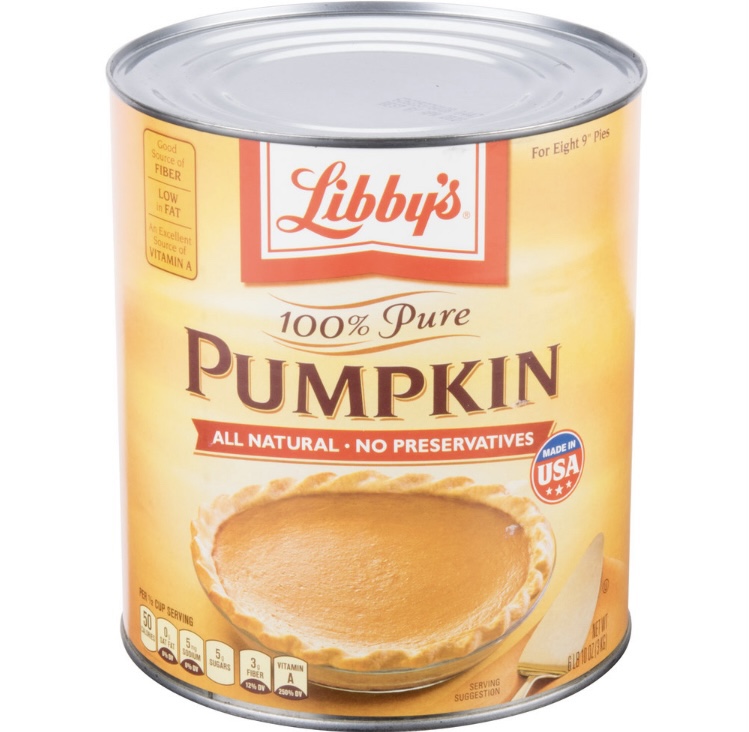
1 can (15 oz) Canned Pumpkin
1 Egg
1 1/2 teaspoon salt
5 cups Flour
DIRECTIONS
Place milk , 1 teaspoon honey and whisk together. Sprinkle yeast on top, set to the side for 5 minutes.
In a large bowl combine and mix together the remaining ingredients. Add the milk mixture and start mixing. Dough will be wet. If the dough is extremely wet you can add some flour, but the dough should remain sticky. Don’t add to much flour at once, a little at a time until you can handle to dough.
After you have the dough mixed together remove from the bowl to a floured surface so you can knead the dough. Knead for 15 minutes.
Lightly butter a bowl and place the dough inside and cover with Saran Wrap. Allow the dough to rise. It should be doubled in size. About 1 1/2 to 2 hours.
Remove dough from bowl. You can use a pastry mat / board, greased surface or parchment paper to use for your work area.
Divide the dough into 4 pieces so it’s easier to handle. Cut the dough into 24 pieces. Grease or butter your hands and roll the dough inward into balls. Place the pieces into a greased pan or pans. Depending on what you have handy.
Cover pans with a kitchen towel and allow the rolls to rise to double or triple the size. About 1 1/2 to 2 hours.
About 30 minutes before the rolls are finished rising turn the oven on to 375 degrees F.
Bake the rolls for 25 – 30 minutes or until golden.
Remove from the oven. Brush the tops of rolls with butter. Let the rolls cool in the pans for 10 minutes. Remove rolls and place on wire rack. These rolls can be served warm or at room temperature.
If needed you can make these a day ahead, so you can concentrate on all the other dinner items.
You can eat more and still lose weight. It’s that easy!
It seems natural: You want to, so you do a diet slash-and-burn, eating less and thinking about food more. The usual result also seems pretty natural: You feel denied, so you give up. Repeat as diet fads come and go. Enough already!
Why not eat more for weight loss and weight maintenance, instead of less? If your schedule does not allow you to exercise, it’s even more important to change your intake values. If your body does not recognize the food as a value, it turns it into FAT… Read through all the articles and see if it makes sense to you. Start to change the inside of you. Read the labels. This will be the most vital part about living healthy. Juicing is an excellent way to intake healthy vitamins and minerals. With the a Juicer you will be able to make healthy juices while still eating a healthy diet.


 Micro shards of plastic are being found in the human brain. So this starts a question of how these microplastics are getting into the … Continue reading Plastic Brain???
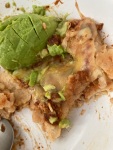 Super fast and easy recipe for this Cheesy Chicken Enchilada Pie with fresh red chili and cinnamon sauce. Layer the tortilla on top of … Continue reading Cheesy Chicken Enchilada Pie with fresh red chili and cinnamon sauce.


 Ingredients:


 How do you think the Chinese survived for so many years? Still to this day they rely on Chinese Medicine, herbs, roots and other natural ingredients to make medicines.
 For an example is the Medical Marijuana medicine. Big Pharmaceutical companies have lobbied against any form of legalization. They are at their wits end because they cannot patent marijuana and they cannot come up with the absolute formula that works the same as the real thing.


 I’m really excited about this post because I’m sharing some really cool stuff about Vitamin C that many people do not know. Or maybe I’m wrong and everyone already knows this but me… We’ll see.


 You can eat more and still lose weight. It’s that easy!
