Category Archives: Recipes

Vegan Flourless Chocolate Cake


Vegan “Flourless” Chocolate Cake Recipe

Video By Granny PottyMouth

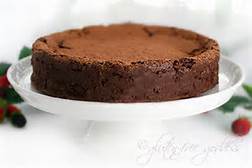
Vegan Chocolate Cake

A deep dark chocolate cake recipe. Just in time for Valentine’s Day. And the best part? It’s not only gluten-free, but vegan as well. And it’s technically a flourless chocolate cake (which for some retro-fueled reason still conjures the term sexy thanks to Sarah Jessica Parker).

In full disclosure (hey, I vet my recipes okay?) I added a scant amount of buckwheat flour to help it set up without eggs, but buckwheat isn’t technically a grain, is it? More of a groat, a fruit kernel. In fact, buckwheat is a cousin to sorrel and rhubarb. I could try to impress you with shout-outs to the Polygonaceae family, dropping botanical distinctions like actinomorphic and calyx as fast as Madonna drops post-Guy Ritchie boyfriends, but I’d rather leave all botany urges behind and get back to chocolate and celebrating the dream of true love.

One important lesson I’ve learned after three years of blogging original recipes and building an on-line audience which insists I keep playing in the kitchen developing recipes that are not only gluten-free, but often dairy-free (and those voracious vegan readers- they’re sprouting up everywhere these days, not to mention the increasing number of devoted mothers writing in daily to request soy-free, and nut-free recipes for their food sensitive kiddos) is to experiment.

The challenge for a gluten-free (or wheat-free) vegan is how to create certain flourless and creamy recipes without eggs. The answer- in every vegan cookbook I’ve ever perused- is tofu. Vegan cooks love their tofu- tofu custards, tofu ice cream, tofu pumpkin pies, tofu stuffed lasagna. Tofu works. It lends an egg-free recipe body and silkiness. But what if- like so many of us ingredient challenged individuals- you are allergic to soy? What then? Then, my friend, tofu is no magic bullet. Tofu is the enemy. In fact, I am sorry to tell you, tofu sucks.

What if, I started to imagine, I melted Belgian dark chocolate and tweaked my pumpkin pie to turn it into a flourless chocolate cake? (See how my fevered little associative thinking brain works?) I could use pumpkin for the eggs/tofu. Why not?

So send me a kiss when you’ve baked this chocolaty confection. And most of all, be sure to kiss the one you love. Young and old. Seasoned and brand new. Straight, gay and in between. Celebrate love in all its generous forms this Valentine’s Day.

And don’t forget to love yourself.

Because that, Babycakes, is where the seed of true love begins to grow.

Vegan “Flourless” Chocolate Cake Recipe

By Karina Allrich August 2009. Febuary 2009.

You can make this cake batter in a Vita-Mix or a food processor, following the method explained in my recipe for Flourless Chocolate Cake (the recipe with eggs and butter). Easy. Easy.

First:

Brew 1/2 cup very hot, double strong coffee or espresso (decaf works); or use 2 rounded tablespoons of instant coffee in 1/2 cup freshly boiled water. Sweeten with stevia, to taste (or sugar).

Preheat the oven to 350ºF. Line the bottom of a 9-inch Springform pan with greased parchment paper.

Ingredients:

6 ounces unsweetened dark chocolate, broken into pieces

1 1/2 cups organic coconut milk or vanilla soy milk, gently heated

1 tablespoon bourbon vanilla

1 14-oz can organic pumpkin puree

1 1/4 cup organic golden brown sugar

1/2 cup GF buckwheat flour or sorghum flour

2 tablespoons tapioca or potato starch

1 tablespoon dry Ener-G Egg Replacer

1 teaspoon xanthan gum

1/2 teaspoon sea salt

1 1/2 teaspoons baking powder

1 teaspoon cinnamon or ginger

Instructions:

Place the chocolate pieces in the Vita-Mix (or a high speed blender container); add the hot coffee and heated hemp milk. Cover tightly- use caution with hot liquids. Turn on the mixer to high. Blend until chocolate pieces are melted. Add the vanilla extract, and pumpkin puree. Cover. Blend a minute.

Add the brown sugar, buckwheat flour, tapioca, egg replacer, xanthan gum, sea salt, baking powder, cinnamon or ginger. Cover. Blend on high for a minute. Turn it off (unplug it for safety if you have kids nearby). Open the top and using a plastic spatula scrape down the sides if any flour is sticking to the sides- if you’re using a food processor instead, do the same. Cover. Plug back in.

Blend for another minute or two until the batter is creamy and smooth.

Pour the batter into the prepared cake pan; scrape all the batter out with a smallish silicone spatula. Smooth the top evenly.

Bake in the center of the oven until the cake is firm- anywhere from 50 to 60 minutes. Here at almost 7,000 feet it baked in 57 minutes. Check the cake sooner if your experience indicates that flourless cakes and pies bake up quicker than 50 minutes; also, if your experience is that these types of recipes bake longer- check at 50 to 55 minutes; and follow your instincts. The center will be the last to cook- it shouldn’t be wiggly.Cool the cake on a wire rack. The top will collapse a bit- no worries. When the cake has cooled, cover and chill it at least two hours before serving. The longer the better.

Chilling creates a dense fudgy cake. I froze some pieces and tried one ice cold from the freezer- it tasted like a Fudgsicle.

Serve with chocolate sauce, a few ripe berries, a dusting of confectioner’s sugar, or a few fresh mint leaves. Serves 8 to 10.

We enjoy sugary treats in moderation, don’t we? Gluten-Free Goddess advises consuming no more than 2 tablespoons of sugar a day.

For substitutions, please see my guide to baking with substitutions here.

Video By Granny PottyMouth

Chewy Gooey Brownies…


Chewy Gooey Brownies…

This is a wonderful recipe for more Holiday goodness

Fresh Baked Brownies with a scoop of Organic Vanilla Ice Cream.. Baking Cookies 101..

food-001

INGREDIENTS

    • 1/2 cup butter
    • 1 cup white sugar
    • 2 eggs
    • 1 teaspoon vanilla extract
    • 1/3 cup unsweetened cocoa powder
    • 1/2 cup all-purpose flour
    • 1/4 teaspoon salt
    • 1/4 teaspoon baking powder


Frosting:

  • 3 tablespoons butter, softened
  • 3 tablespoons unsweetened cocoa powder
  • 1 tablespoon honey
  • 1 teaspoon vanilla extract
  • 1 cup confectioners’ sugar

Directions

  • Preheat oven to 350 degrees F (175 degrees C)
  • Grease and flour an 8-inch square pan.
  • In a large saucepan, melt 1/2 cup butter.
  • Remove from heat, and stir in sugar, eggs, and 1 teaspoon vanilla
  • Beat in 1/3 cup cocoa, 1/2 cup flour, salt, and baking powder
  • Spread batter into prepared pan.
  • Bake in preheated oven for 25 to 30 minutes. Do not overcook.

To Make Frosting:

  • Combine 3 tablespoons softened butter, 3 tablespoons cocoa, honey, 1 teaspoon vanilla extract, and 1 cup confectioners’ sugar. Stir until smooth. Frost brownies while they are still warm.

Save

Chicken in a Pot


Chicken in a Pot

This is a wonderful recipe for a cold blustery day.

chicken-in-a-pot-recipe
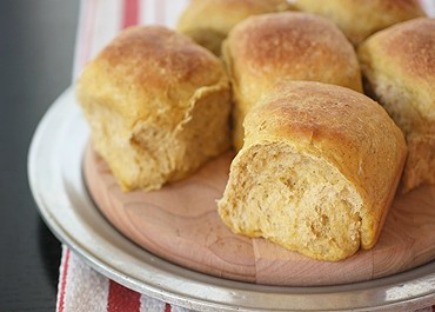
Bake a fresh loaf of bread to go with this delicious meal.Spice it up and add some crushed red pepper.. Cooking In A Pot 101..

INGREDIENTS

  • 3/4 cup chicken broth
  • 1 1/2 tablespoons tomato paste
  • 1/4 teaspoon ground black pepper
  • 1/2 teaspoon dried oregano
  • 1/8 teaspoon salt
  • 1 clove garlic, minced
  • 4 boneless, skinless chicken breast halves
  • 3 tablespoons dry bread crumbs
  • 2 teaspoons olive oil
  • 2 cups fresh sliced mushrooms

Directions

  • In a medium bowl, combine the broth, tomato paste, ground black pepper, oregano, salt and garlic. Mix well and set aside
  • Dredge the chicken in the bread crumbs, coating well.
  • Heat the oil in a large skillet over medium high heat. Saute the chicken in the oil for 2 minutes per side, or until lightly browned.
  • Add the reserved broth mixture and the mushrooms to the skillet and bring to a boil. Then cover, reduce heat to low and simmer for 20 minutes.
  • Remove chicken and set aside, covering to keep it warm.
  • Bring broth mixture to a boil and cook for 4 minutes, or until reduced to desired thickness. Spoon sauce over the chicken and serve.

Save

More wonderful Holiday Cookies… Simple Sugar


This is a wonderful Simple Sugar cookie.

Simple sugar cookie
Simple sugar cookie

Dress them up for the Holidays with Frosting, sprinkles and colored sugar. Spice it up and add food coloring to your Dough. Sugar Cookie 101..


INGREDIENTS

  • 2 3/4 cups all-purpose flour
  • 1 teaspoon baking soda
  • 1/2 teaspoon baking powder
  • 1 cup butter, softened
  • 1 1/2 cups white sugar
  • 1 egg
  • 1 teaspoon vanilla extract

Directions

  • Preheat oven to 375 degrees F (190 degrees C).
  • In a small bowl, stir together flour, baking soda, and baking powder. Set aside.
  • In a large bowl, cream together the butter and sugar until smooth.
  • Beat in egg and vanilla.
  • Gradually blend in the dry ingredients.
  • Roll rounded teaspoonfuls of dough into balls, and place onto un-greased cookie sheets.
  • Bake 8 to 10 minutes in the preheated oven, or until golden.
  • Let stand on cookie sheet two minutes before removing to cool on wire racks.

http://www.youtube.com/watch?v=ChYHkqtkHFM

Another Great Cookie Recipe


Snowman Oreo-Truffles

Cookie Truffles

You only need three ingredients to make these white chocolate treats. They’re great for parties or to give as gifts.

Oreo Truffles cookies

Cookie Truffles
Ingredients

1 11.9 ounce package chocolate sandwich cookies with white filling (30 cookies), finely crushed
1 8 ounce package cream cheese, softened
1 pound white baking chocolate, coarsely chopped

Directions

Line a large baking sheet with parchment, waxed paper or foil; set aside.
In a large bowl combine crushed cookies and cream cheese. Beat with an electric mixer on low speed until well mixed.
Shape mixture into 1-inch balls. Chill or freeze until firm.
In a large saucepan cook and stir white chocolate over low heat until melted; cool slightly.
Dip each ball into melted white chocolate; let excess drip back into pan. Place dipped truffles on the prepared baking sheet.
Chill truffles about 1 hour or until firm.
Store, covered, in the refrigerator up to 1 week or freeze up to 1 month..

Best Holiday cookies

ToFucken: The Vegan Turducken


Once again we are at that time of year when everyone tries to express themselves through food. We are showing you 3 very different ways to do Turducken. So on to the video, how to stuff a duck down a turkey’s throat. Break out the roaster it’s time for fun. To start we will need the Turkey and the duck. Video #1 starts now


Ok that look’s very tasty. I can’t wait to try it. Very good chum having a good time preparing.

Now our next video is a triple Turducken you could say. I found it to be interesting and would love to try it.

That was a lesson on twisting my tongue. That was the BIG 3Ducken…

TER FUCKEN DUCKEN IT”S DONE… I hope you enjoyed the 3 amazing ways to make Turducken / Turfucken.

For Carrot’s Goodness, During the Holidays Don’t Forget about the Pets


carrot-goodness-dogCarrot Goodness

Doggie Treats

Ingredients:
1 medium ripe banana
1 cup shredded carrots (see note below)
1/4 cup applesauce, unsweetened or a fresh apple pureed
1/8 cup water (you may need to add additional 1/8 cup water)
1 1/2 cups whole wheat flour
1 cup rolled oats

Instructions:
Preheat oven to 350° F
Lightly spray a baking sheet with non-stick spray.
Mash the ripe banana in a small bowl. Grate the carrots, and mix with the banana. Then pour in the applesauce and water. In a medium bowl, whisk together the flour and oats. Make a well in the center of the dry ingredients and pour in the carrot mixture. Stir until thoroughly combined. Roll into marble size balls, flatten with fork to 1/2 inch thickness. Place on the baking sheet and bake for 25 minutes. Let them cool overnight in the oven for crispy treats.


Save

WHAT DOES “A CUP OF JOE” MEAN TO YOU?


WHAT DOES “A CUP OF JOE” MEAN TO YOU?

Are You A Consumer Or Connoisseur of Great Health Benefits?

What is the best cup of coffee you have ever had?

by: http://www.orgnatlife.com

Well that could be a long list or a very short one. The bigger BOXED coffee shops as Star$$$$’s really does not appeal to me. Boring, run of the mill. It’s the smaller shops that actually make a good cup of coffee, or maybe it’s the atmosphere that makes it taste so good. Either way the atmosphere is comfy and inviting. Big oversized chairs to relax in and read a book or chat with others while you sip that wonderful drink.. Sounds like home.

Speaking of terminology.. Lord give me a break. If one more establishment comes up with another tongue twisting drink that takes 5 minutes to order and another 20 minutes to make, I will have to stop altogether. What ever happen to the good Old days when a cup of Joe was just that a cup of joe?

Well we are about to find out… When espresso came to America and where did espresso come from originally? Italy you say…  NO.

Espresso first appeared in Italy in the early 20th century. Coffee had already become a necessity to Italian daily life thanks to North African Muslims who brought it through Venice’s ports during the Renaissance. We owe much of the mystique coffee to Venetian merchants who charged wealthy patrons hefty sums to try out this newfangled drink when the first coffeehouses opened in the 1640’s.

Fast forward about 200 years and we find business man Luigi Bezzera tinkering away with this coffee pot to find a way to make coffee faster. In 1903, Bezzera owned a manufacturing business and was frustrated by the time-consuming process of brewing his own coffee at home each morning.

He soon found that adding steam pressure to the machine not only cut down on the brewing process but also produced a stronger, more robust cup of coffee. This new quick-brew process drew out the coffee bean’s best qualities but somehow avoided over extraction.

Bezzera immediately named his invention the “Fast Coffee Machine”. Since the word ‘espresso’ means fast in Italian, the name of the beverage the machine produced was quickly shortened to what we know today.

Unfortunately, Bezzera wasn’t as talented at marketing and sales as he was at engineering. In 1905, another businessman named Desidero Pavoni purchased the machine’s rights from Bezzera and had it patented.

Nowadays you don’t have to travel to Italy to experience Bezzera’s handiwork. The recent boom in espresso’s popularity has brought this Italian treat to every mall and street corner. Next time you decide to pick one up, take a moment to think about the more than 100 years of history inside your cup.

BREWING…

There are several ways to brew the black magic. Easy, put the water in and walk away to grinding, tampering, brewing and mixing the syrups to get that special taste.

For myself I threw out the Drip coffee maker and opted for the french press carafe. To have a rich full bodied aroma wafting through the house is like a beautiful melody running through your mind over and over.

I still say the best was the Percolator, back in the day. I can remember my grandma making coffee on the stove. Watching the coffee going up into the glass bubble on top and back down again, becoming darker in color each time it reached the bubble. Then the electric percolator my mom used was the highlight of the 60’s. Same technique just plug it in and watch it go.. No more standing by the stove and waiting for that perfect cup of coffee.

The Automatic drip machine came into the light. Wow everyone thought this was the BOMB.. Yes it gave you your pot of coffee in 5 minutes. But where was that rich wafting aroma? Gone with the 5 minute cup.

Then we step up to the home brew station for espresso. Ohh, what magic we have in our possession. Soon every house had an espresso machine big and small.

The latest is the One Cup Brew machine. Bringing you pre-made espresso in 50 flavors with no hassle or mess. Every day is a coffee rainbow.

Have fun and try a different blend and technique today…. You might be surprised at the difference a “Technique” actually makes.

Don’t forget about the health benefits of coffee. Black Coffee, not that candy coated crud or Super Hype added extract.

Please!!! Regular black coffee is just fine for me.

Save

It’s Raining Outside… Great Stew Day !!!


It’s Raining Outside… Great Stew Day !!!

It’s Just One Of Those Days… BURRRR!!!

Baby It’s cold outside and I have some warm stew just for you… I think with no doubt this is one mean tasty stew. Just baked some fresh homemade bread to go with it. Make sure you have a Large Pot to cook this awesome stew in. Don’t forget to get some good chili from your neighborhood farmers market. Hope you enjoy. I sure did.

Save

DID YOU KNOW ? I DID NOT !!! To Rinse, Or Not To Rinse


Are you Properly Rinsing Your Rice?

DID YOU KNOW ? I DID NOT !!!

Did you know there are PROPER ways to rinse and polish the rice?

I bet you didn’t, I didn’t until I asked my friend.

If you happen to be so lucky, you are one up on me.

So you soak the rice in a nice BIG bowl for 5 minutes in cold water. No Make the Bowl to small. Ya you hear me!!!… Playing Deaf again… PRETENDER.. ! You rinse with water, do this 2 times. You Still Here!!!

Fill the BIG BOWL back up this time you start to polish the rice. Yes I said Polish….

Cupping The Rice Cupping The Rice

You place both your hands around the rice and cup and rub back and forth in the water until the water is cloudy. Rinse with small flow of water while gently moving this rice around with your fingers. Do this procedure 4 times until the rice has sheen to it.

Final rinse under water. You can see the clear water...

Final rinse under water. You can see the clear water… One last rinse but NO POLISH THE RICE… Place rice in your rice cooker pan, add water to desired measurement and start your rice cooker. You are off to tender flavorful fluffy rice tonight.

Save

DIY Holiday Cookies, CORINNE VS COOKING #2 (FEAT. SANTA)


DIY Holiday Cookies, CORINNE VS COOKING #2 (FEAT. SANTA)
Published on Dec 19, 2015
HO HO HO MO FO’s … Watch Rob and Corinne

https://youtu.be/VAuldCS5UNc


Having your Vegetarian friends over… VEGGIE 911


Having your Vegetarian friends over… VEGGIE 911

pumpkin-alfredo-pastal-vegetarian
Vegetarian pumpkin Alfredo pasta

Click Here To Get all the recipes

Save

Whiskey Cocktails That Are Literally Made For Winter


Whiskey Cocktails That Are Literally Made For Winter.
Winter and whiskey make the perfect pair. By Hannah Petertil
Nov 29, 2016

whiskeydrink

Take your love of whiskey to the next level with these cocktails tailored for chilly weather.

Save

15 Super Stuffed Cookies


Warning: Your inner cookie monster is about to become unleashed.

By Sienna Fantozzi
Dec 23, 2015

Get The Recipes
Get The Recipes

The 86 Most Delish Homemade Cookies


The 86 Most Delish Homemade Cookies
A cookie a day keeps the sadness away. By Sienna Fantozzi
Nov 22, 2016

delish-oreo-chip-cookies-lanscape
PHOTO GALLERY Click for recipes

check out all the recipes

Save

Why should you cook for your pets?


Why should you cook for your pets?
Feeding your pets a healthy diet is simple and easy.

dogfood2

This is a simple recipe

  • 2 lbs. Hamburger
  • 2 lbs cooked pasta
  • 12 oz bag of Peas
  • 5 Carrots chopped small
  • 1 Potato peeled cut small
  • 3 Celery stocks chopped small
  • 2 Tbls Spirulina
  • 2 Tbls Coconut Oil (organic cold pressed)
  • 1 Teaspoon Braggs Apple Cider Vinegar
  • 1/3 cup Plain Yogurt (no sugar)

Cook the hamburger in a large pan and drain, cook the pasta and drain.Take the large pan of hamburger and add your veggies and water to cover 2 inches above veggies. Boil for 1 hour and add water back up to 2 inches above food. Remove from heat. Add your vinegar, yogurt, spirulina, coconut oil and mix it all up. Add your pasta and let it cool down before you serve it to your dog.

Check out our Source: Why should you cook for your pets?

Save

Save

Around The World: 50 Slamming Panini’s


Around The World: 50 Slamming Panini’s

Tired of driving 10 miles to get your favorite Panini?

Problem solved, cook it yourself.  With the right ingredients that panini joint 10 miles away has slipped your mind entirely.

Guaranteed your ingredients are fresh and not left overs from the day before. Here are 50 slamming recipes from around the world.

Check out these recipes on Allrecipes.com

Chef Sherrie Angel’s Pumpkin Dinner Rolls


Chef Sherrie Angel’s Pumpkin Dinner Rolls

Pumpkin Rolls for Thanksgiving and Christmas… Yummy

Chef Sherrie Angel “Slam Dunks” Thanksgiving this year with her Pumpkin Dinner Rolls. Creamy smooth texture that melts in your mouth. Bite after bite you can taste every spice layered across your pallet correctly.

Let’s not forget about the star of the day. Juicy seasoned to perfection turkey with chicken sausage gravy & all the sides to complete the meal.

I made my dough in the bread maker, but i have added instructions for making it by hand.

Risen twice and then baked to perfection. But we will give the directions for old school mixing in a bowl.

Chef Sherrie Angel… Rocks the Kitchen with Pumpkin Rolls

INGREDIENTS

  • 1/2 cup warm Whole Milk
  • 1/4 cup Honey
  • 1/4 cup salted Butter
  • 2 1/4 teaspoons Active Dry Yeast
  • 1 can (15 oz) Canned Pumpkin
  • 1 Egg
  • 1 1/2 teaspoon salt
  • 5 cups Flour

DIRECTIONS

Place milk , 1 teaspoon honey and whisk together. Sprinkle yeast on top, set to the side for 5 minutes.

In a large bowl combine and mix together the remaining ingredients. Add the milk mixture and start mixing. Dough will be wet. If the dough is extremely wet you can add some flour, but the dough should remain sticky. Don’t add to much flour at once, a little at a time until you can handle to dough.

After you have the dough mixed together remove from the bowl to a floured surface so you can knead the dough. Knead for 15 minutes.

Lightly butter a bowl and place the dough inside and cover with Saran Wrap. Allow the dough to rise. It should be doubled in size. About 1 1/2 to 2 hours.

Remove dough from bowl. You can use a pastry mat / board, greased surface or parchment paper to use for your work area.

Divide the dough into 4 pieces so it’s easier to handle. Cut the dough into 24 pieces. Grease or butter your hands and roll the dough inward into balls. Place the pieces into a greased pan or pans. Depending on what you have handy.

Cover pans with a kitchen towel and allow the rolls to rise to double or triple the size. About 1 1/2 to 2 hours.

About 30 minutes before the rolls are finished rising turn the oven on to 375 degrees F.

Bake the rolls for 25 – 30 minutes or until golden.

Remove from the oven. Brush the tops of rolls with butter. Let the rolls cool in the pans for 10 minutes. Remove rolls and place on wire rack. These rolls can be served warm or at room temperature.

If needed you can make these a day ahead, so you can concentrate on all the other dinner items.

BON APPETIT