
Prune Danish
BY: Cooking Is Therapy
Check the website for complete recipe and pictures.
At one time I had the good fortune to live near a remarkable Jewish Bakery. They created the most eye catching flavorful desserts I had ever seen or tasted. When I moved out of the area and realized I no longer had access to some of my favorites; I decided it was time to start creating my own. One of these fabulous treats was Prune Danish. Now many people just are not into prunes always seeing them as simply a source of fiber for regularity. However, their flavor complements the flaky pastry crust that surrounds them. Prunes are NOT just for fiber any more! And so let me entice you to try making what you see above and enjoying the aroma and flavor of your own freshly baked Prune Danish!
Below are two versions you may follow. The Puff Pastry and Lekvar Prune Butter are what yielded the photo above. BUT you can also create your own prune filling and use a softer pastry as will be detailed in what follows. Mix, match and try what you will as they will still taste great.
Let us begin with the Puff pastry:
2 1/2 sticks cold unsalted butter
1/2 cup cold tap (or bottled) water
1 tsp salt
2 cups all purpose flour
1/2 tsp vanilla
1/8 tsp Cardamom (ground)
Measure the water, add the salt and vanilla, stir to dissolve and set aside.
Cut up butter into small size chunks ( I cut 1/2 inch pats then split those into four)
Place flour and cardamom into bowl of food processor with METAL blade (not dough blade)
Add about 1/2 stick’s worth of the cut up butter and pulse 12 times for one second each
Add remaining butter and long pulse twice to incorporate (5 seconds each)
Add water and pulse three or four times until dough forms a rough ball.
Flour your work surface (I use a large wooden pastry board) and scrape dough out of processor onto the floured surface.
Shape dough into a rough rectangle and place between two LARGE sheets of plastic wrap (OR you could use waxed paper).
Roll dough into a 12X18 inch rectangle
Peel away top plastic then invert dough onto floured work surface
Peel away second plastic then fold dough in thirds on the width so as to end up with a 6X18 inch rectangle. Fold one side in then the other overlapping.
Roll up dough from a six inch side making sure the end is on the bottom.
Press dough into a a square, wrap in plastic and refrigerate one hour.
Pastry number two is a softer one:
1 8oz. brick of cream cheese
3 sticks of butter (salted)
3 cups all purpose flour
1/8 tsp cardamom
1 tsp vanilla
Place 3 cups flour and 1/8 tsp cardamom into food processor with metal blade
Cut up butter into smaller chunks (cut 1/2 inch pats then cut each into 4)
Cut up Cream cheese into rough chunks as well
Add butter to processor and pulse until four and butter combine roughly
Add cream cheese and vanilla and pulse until the dough comes together
CAREFULLY remove from processor and work with your hands into a ball
Place in a bowl and cover with plastic wrap then into the fridge for one hour.
Those are the two dough options. Both taste good.
As to the prune filling – well I really like the Simon Fischer Lekvar Prune Butter in the18oz jar. I have bought it on Amazon. It is Natural and tastes really good. I have even spread it on English muffins for breakfast. They sell the jars as a pack of 6 which is okay as they will last you a while. They also sell 17oz in a pack of 3 but you pay shipping so the six pack is a better value. Try this stuff it is REALLY good. I used to use the Solo Prune Filling in the can until my grocery store stopped carrying it. Now I realize they did me a favor as that one was nowhere near as good as Simon Fischer.
IF you feel REALLY ambitious and would rather make your own prune filling then here goes MY version.
2 cups pitted prunes
1/2 cup dark raisins
1 cup Brandy (or if you do not like using alcohol use boiling water)
3/4 cup mild honey
1/8 tsp salt
1 tsp grated Orange Peel (fresh grated or from the jar)
(I use a Microplane to get very fine fresh orange and lemon peels. If you do not have one GET one – they are wonderful.)
Put prunes and raisins into a container or bowl and pour on brandy (or boiling water). Stir well and cover with container lid or plastic wrap. (Brandy gives a great flavor and the alcohol will cook out anyway).
Allow fruit to soak overnight
Place softened fruit into food processor with metal blade
Add peel and salt and pulse three or four times
Add honey and run processor until well mixed and smooth
Do not worry if mixture seems thin as you are going to refrigerate this overnight and it will firm up at that time.
Notice I do NOT cook the prunes as do many recipes. I do not like the taste or texture. The alcohol in the Brandy really plumps and tenderizes the fruit. Boiling water will do okay but not as good as Brandy!
NOW whichever dough you have made you will cut into four equal parts. That is if you like your Danish LARGE with lots of filling – as I DO! If you want smaller ones then by all means divide further. The techniques are the same regardless so YOU decide.
For the Puff Pastry roll each part of dough on Floured surface until you have a 6″X6″ square.
(That is for the four LARGE size as shown above)
For the soft pastry instead of flour you will coat your work surface with a mixture of 1 cup confectioners sugar and 1 cu granulated sugar. Mix them up together and use like flour on work surface to roll out dough.
Puff Pastry:
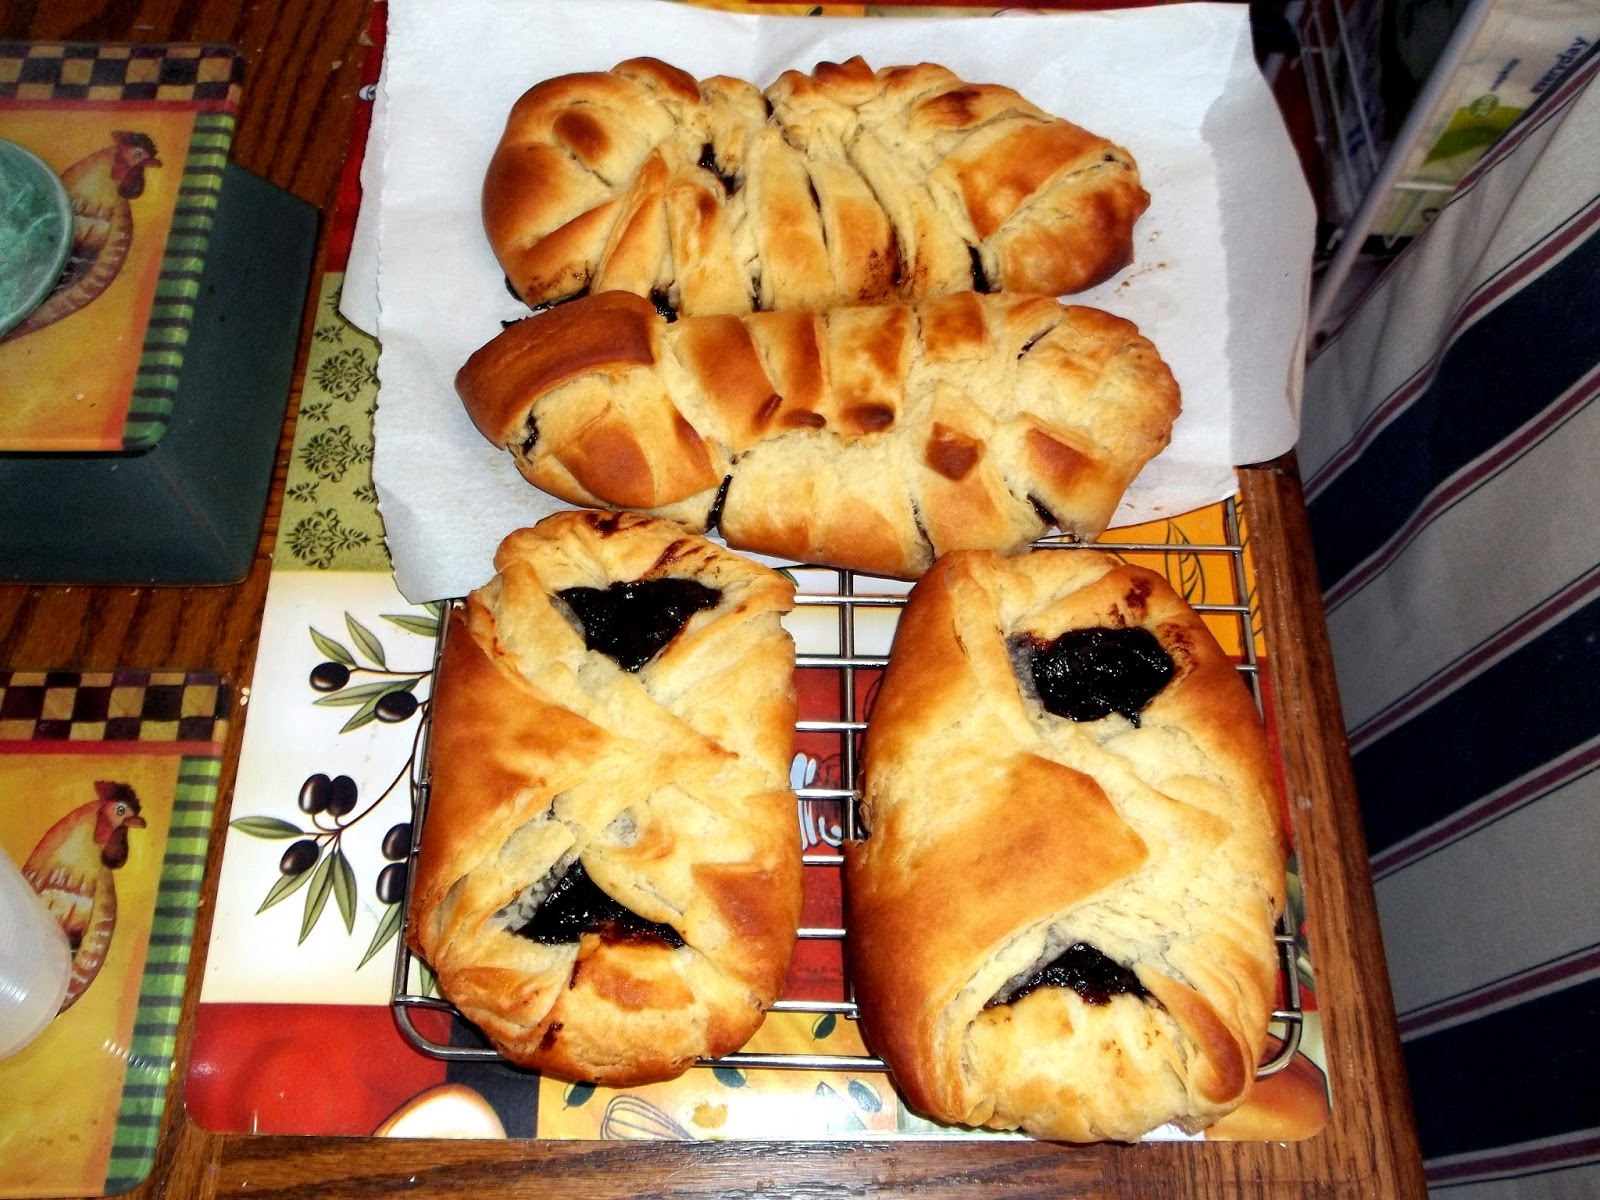
For the two front danish in the photo which are the standard looking type, look at the 6X6 square from one point so you see what is like a diamond shape. I use a Tablespoon and a teaspoon to load the filling down the center of the diamond leaving an inch at either “tip”. I use quite a bit of prune in each because I like it that way and the bakery I once frequented did the same.
NOW you will fold the two SIDE tips inwards so they overlap over the prune filling (just like you see in the photo above.) Also curl up the other two end points making a sort of ridge which will help keep any filling from running out. This is for the standard look.
Use a large flat spatula to lift the danish from the work surface on to your baking sheet.
I use a standard cookie sheet which is lined with a Silpat. You can buy Silpat (or silicone) liners on Amazon OR when they have them Costco sells a set for a LOT cheaper. I always have TWO silpat lined cookie sheets for when I make cookies.
The other fancier danish starts out the same with the square but now you look at it AS a square and load the filling down the center leaving an inch at either end.
Next you will use a sharp knife to slice the dough into strips coming no closer to the filling than a half inch.
Like a lattice you will fold first one “flap” then its opposing over the filling so they overlap.
Just look at the picture above and you can see what I am trying to describe. I like the look of these for some reason.
Check out these great recipes by Cooking is Therapy
Soft Pastry:
Use the “square/diamond” instructions above only coat your surface with the mix of confectioners and granulated sugars. I would NOT try the overlapping strips with this softer dough. You might end up with a mess.
In both cases place cookie sheet with pastries into the fridge while the oven preheats to 350.
Before placing in oven either spray top surface of pastries LIGHTLY with PAM (and please use the original as it has the best taste) OR separate out an egg white and whip it up with a whisk until it is more liquid. Brush this on the tops of the pastries if you wish. I prefer the PAM as I do not like the added egg taste.
Start out setting your timer at fifteen minutes and then check every five minutes after that until pastry is golden brown as above.
DO NOT leave and do NOT forget to check. Every oven is different and there is no way to be exact with timing. Just go by smell and sight to judge when these are done.
Remove from oven leave ten minutes then transfer to cooling racks. Enjoy!

